New member here. I’m doing a new house build and decided I want to get into home automation. I’m a software engineer in the USA so some of the hardware stuff is new to me and I have to deal with what’s available and “up to code”. After researching a bunch of projects (lighting, blinds, etc) I decided to prioritize some basic network-connected multi-room audio since:
In doing lighting or anything else I’ll have to deal far more with electricians and building code
My wife loves having some music playing throughout the day (easy to get her buyoff)
Low-risk - If it breaks the house as a whole still functions fine
It also seems like one of the best projects where buying retail vs DIY seems FAR more in the favor of DIY. I’ve got the following plan but I am so inexperienced in this I wanted to see if I could get some feedback on it.
Estimate (10 nodes): $1000 - As long as the speaker wire is pre-wired I can do it all at once or spread this out over time.
A couple specific questions:
The amp hats power the pi zeros they are connected to. I assume the PSU should work for multiple nodes. Is the PSU safe and suitable to run say… 10 nodes?
I’m not sure that I can cut cost down any more “per room” on most of the items. The amp is obviously the most expensive thing but I’m not sure I can do any better for a “home run” setup while getting a strong enough signal to the speaker. However, the one thing I do see that would be notable would be the USB OTG -> RJ45 adapter. I’m curious whether there’s a media server that would run the nodes via a USB hub instead. A decent USB hub should be of sufficient speed to stream basic audio and would be cheaper than the $14/room I think but there’s no mention of any of the audio servers (for example, SqueezeBox) that are actually able to communicate via USB.
I think the longest individual speaker run will be around 50ft. Should the amp/speaker chosen be able to handle that “reasonably” well? I’m not an “audiophile” (I typically use “stock” speakers on any vehicle or device I own, I use a single soundbar on my TV, etc) but I don’t want it to sounds terrible either.
An excellent post, I really appreciate the care you have taken into explaining your plan to us.
But … ; -) … I’m not clear what your listed PSU will power, all of the RPis or just the central Pi? If all of the RPIs, what sort of cabling will carry the power from the PSU to each RPi? (Sorry if I have missed this in your post).
You might want to consider powering your RPIs via POE (Power over Ethernet). So your ethernet cable carries the audo signal, as well as the power required to run the RPi.
This could be as simple as getting a POE enabled switch (maybe a router). On Ebay, there seems to be a constant stream of used industrial units that are very cheap (at least in the US). Because they were so cheap, I bought two of them, so I’d have a backup.
It’s also possible to buy separate POE injectors that you would then manage at the switch end of your system. I believe Jonathan;s setup includes such a item.
You’d also need a splitter at the RPi end, that splits out the power from the ethernet from the one cable connecting the unit to the POE enabled switch.
At some point I hope to work on such a project myself, so I’ll be eager to read how things go for you.
Being as I am an audiophile, I wanted to throw my two cents in here. When it comes to room audio, you get absolutely what you pay for. For some people just having noise in the room is enough but for others it needs to be a little bit higher quality than a $5 boom box from the dollar store. This is the exact reason why so many of these home audio systems are so blasted expensive. To get decent audio you need a decent driver. Those speakers or drivers as they’re called in the audio world need to be of decent quality to get decent audio. It doesn’t sound to me like you are one that really needs high-end sound but if you’re going to go to all this work I would make sure that you do it right with a little bit pricier gear so that you can have better audio quality.
It appears that what you are trying to do is to put audio control in each room by using the raspberry pi as a head unit and receiver using the pie hat as an amplifier (because that is obviously what the amp is for:>) and have your sound output through free air type speakers. There are small in wall units that are powered with a wall wart that do exactly the same thing for about the same price and don’t have the maintenance overhead. Pyle makes a in-wall amplifier like that that sells on Amazon for about $90. Obviously it doesn’t do anything but put out audio so you couldn’t use it as a remote automation Point ever in the future but I am a firm believer in keeping your audio away from your home automation just because of electrical noise and other things like that. But I would look more into whole house audio type systems instead of trying to take a micro computer and turn it into a head unit. That is purely my opinion though as I am an audiophile guy and has multiple head units in different areas because I want Power and I want quality and I have yet to find a way to get both of those via a Raspberry Pi.
After thinking about it for a minute I should probably add to my post. Using a Raspberry Pi as a head unit isn’t a bad idea overall, but I would use it as a main head unit to drive a higher power amplifier that then goes to all of the other rooms. A large majority of the in-house audio systems have what is basically a head unit and an amplifier and then they feed out to all of the other rooms. In each room there is some sort of volume control and/or an input so that you can connect your phone to it in the room you’re in and control the audio. Those systems of course are well into the many thousands of dollars but you can recreate that with a Raspberry Pi as your head unit, an amplifier to push that stereo audio out to multiple rooms and probably come up with some sort of automated switching for those speakers. Tjus could be accomplished by using multiple relays like the 8 and 16 relay blocks the people buy to hook to arduinos. You could set something up where the output audio went into a relay control board and the relay is turned on and off to the individual room outputs by just opening the circuit. Each room could then have some sort of rheostat to control actual room volume. So your speaker wiring would go through the relay which could be controlled via your Raspberry Pi or an Arduino and then to each room where it would go to a panel with a volume control knob and an on-off switch or whatever. That way you could have as much power as you wanted to pump to each room available all the time and have individual room audio controls. At that point you could then use a phone app or something like that to control your Raspberry Pi for what you want to be played throughout the house. Now this would only allow for one audio source at a time which your Raspberry Pi in each room solution would change but you can buy very inexpensive audio amps that would supply enough wattage to run any room you wanted up to and including all rooms at the same time without any issues.
One of the key things to getting decent quality sound is obviously speaker quality however wattage available to push to the speakers is also a key element. If you take a low-wattage amplifier and crank it to its Max all it is going to do is give you loud distorted audio. Whereas if you give an amplifier with a lot of wattage a smaller input or actually a lower output the sound will be better because it stays within its range. It’s like speaking in a normal voice vs screaming at the top of your lungs your normal voice will be clear then the screaming will be. So you’re better to have higher wattage amplifier and decent speakers to carry that wattage then you would be to have say a 10 watt amplifier and a speaker with a 15 or 20 watt maximum power carrying capacity
Basically. You would use your Raspberry Pi as your media controller. Such as to play any audio from any online sources or from an MP3 collection. Then you would run that through a DAC and into an amplifier. The one that you listed as an example is okay, extreme overkill as 8000w is way more than you would ever need, but it would work. I would say that 200 to 300 watts is probably enough unless you’re going to install really big speakers in each of the rooms. And when I say really big I mean like subwoofer size speakers. A 200 watt amp will basically run 8 to 10 standard size speakers like the ones you listed initially with room to spare. Those that you listed in their spec say 20 to 200 Watts but my money says 50 watts and they let the smoke out. But they will work for what you’re trying to do.
So basically you go from the pie to the DAC to the amplifier and then into a relay control board. The one that you used as an example would work but it is not necessary to have one that bonds directly to your pie. If you go into the Amazon site and type in 8 relay board or 16 relay board you’ll come up with one that looks basically like what was on the pie & is an external board. You would run your amplifier outputs into the relays and the output of the relays would go to your individual rooms. At those rooms you could either install a wall plate with rheostat to control the volume or if you could work out the logistics through your phone app to turn the volume on the DAC up and down you wouldn’t need rheostats in the rooms. Through the app that you build you could create an app that allows you to select individual rooms to turn the speakers on and off which the pi would then activate those relays for that room and if you could work out the remote volume control from your pie or through your DAC you could then control the volume of the entire system as a single output.
The purpose of having a single pie into a DAC into an amplifier through a relay board set and out to the individual rooms is the exact same thing that John is doing by centralizing his openhab node red controller going through individual relays to each room to turn the lights on and off it just means less equipment that can fail or have to be updated like as in his first generation of lighting controls where he had equipment at every single light switch to control every single room and it became top-heavy to maintain. By putting a pi in each room with a hat on it to run a system basically means that each room is its own individual audio environment which makes it more convenient if you want to listen to something different than what somebody else wants to listen to but it would be cheaper at that point to just have a Bluetooth speaker sitting on a table somewhere in the room. I hope all that makes sense.
Commercial home automation systems install the head unit and the controller in one space and then run the wires from there out to individual rooms and they either have mechanical or manual controls like a rheostat and a switch on the wall in each room to control volume and whether the speakers are on or off or they use a completely digital system which has controllers either infrared or Bluetooth in every room that sends a signal back to the head unit to tell it what to do which is why they are so expensive.
Am I right in thinking I would need 2-channels per room if I decide to go 2 speakers/room or would it be feasible to go with a 2-channel amp and an 8-zone distribution panel?
No. 2 channels for the whole house is fine but 4 channels split as evenly as possible is okay as well. The majority of amps have 4 channels as a default.
(A lot cheaper as singles and got one even cheaper via “warehouse deal”. The price doesn’t bode well for quality but better finding out after experimenting with a few as opposed to ordering the whole lot)
With tax and a couple misc cables, resistors, etc that I’ll need the total came to about $280 USD. I left off the Pi 3B+ as I’ve got an old Pi 2B I can experiment with and I only got enough speakers and volume controls that I can even verify things actually work. Somebody wrote up their experience dealing with the relay board and posted a manual here that I plan on using.
I’m waiting on shipping now and with any luck it won’t be a couple waste.
My plan once I get everything is to do things incrementally:
Existing known audio source -> Amp -> Speakers
Pi+DAC -> Amp -> Speakers
Pi+DAC -> Amp -> Volume -> Speakers
Pi+DAC -> Amp -> Distribution -> Speakers
Pi+DAC -> Amp -> Distribution -> Volume -> Speakers (and then add more speakers)
Add Relays, Test combinations of “rooms”
Add streaming sources, mobile UI, and voice commands
I haven’t gotten around to fully checking that I’ll be able to combine the Pi, DAC, and relay board all on one Pi but I’ve got a spare Zero W and a Pine64 that I can sub in for experimentation if needed.
I hope to take photos/video as I go and provided there’s something of value (whether success or failure) I plan to upload the experience.
That is good that you found a speaker breakout panel. That will help a lot. And actually with the in-room volume controls you really don’t need the eight relay block at this point. But down the road you might decide to use it between the speaker break out panel and your relay block so that you have a remote way to disconnect each room but I assume that those speaker volume controls actually have a zero point on them meaning that once the volume is turned all the way down it is essentially disconnecting the speakers. Which is exactly what the 8 relay board was going to do. But you are absolutely on the right track and it looks like your incremental roll-out plan for testing is Bulletproof. I say that tongue-in-cheek of course because we all know what happens when you try and plan for every contingency. I excitedly await to see what you have in store for this build.
If I’m understanding that right, doing the relays, means you should be able to add extra audio streams incrementally, by duplicating the dac/amp/relay section, and tying the relay outputs together (with some logic to prevent two streams being dumped onto the same room run, that could get messy).
So then you’d need one dac/amp/relay set per person… about what, $300 per person, rather than $300 per room… This way, you CAN have a speaker in the shower and dunny too…!
Then you just need presence detection so the music follows your phone automagically…
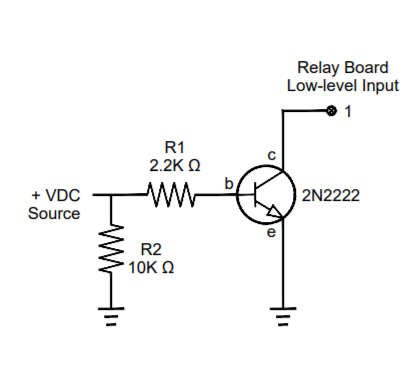
I’m still waiting on the amp so I’ve begun fiddling with the relays. As I understand it from multiple postings I’ve seen on forums and such, it’s best to protect the pi via the following:
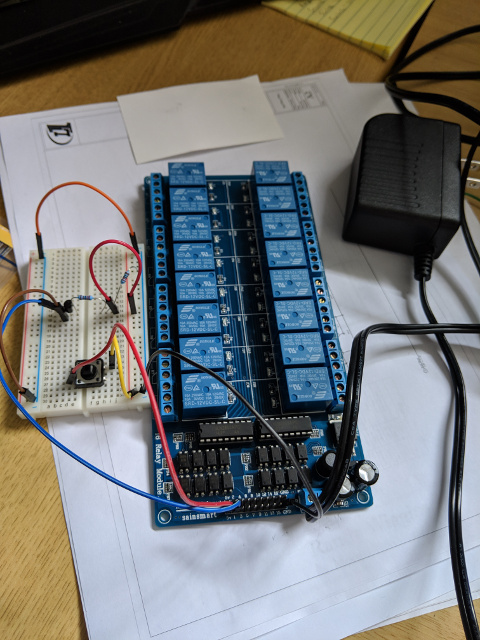
I played with this, and ended up with the following on a breadboard passing through a button (novice setup, I know):
If I hold the button down it does actually flip the relay so that’s good. Next I’ll be wiring it to the Pi and attempting to control the relay from the pi itself. However, when i’m done I’ll be not wanting to use a breadboard so I’m learning and researching into designing a PCB. I have very little idea of what I’m doing but I’m feeling may way through the dark. I have a rough draft but I’m having a friend who is an electrical engineer take a look before I post it so I don’t make a fool of myself or mislead any other novices into using a poor example.
I started playing around a bit on https://easyeda.com. Does anybody have any feedback on that service? Any other suggestions?
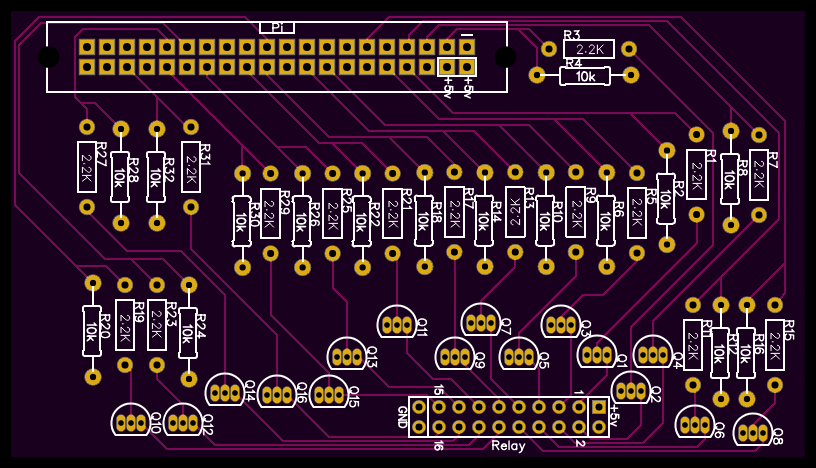
The back side of the board has a solid ground plane and a large +5v track that powers the pi. I mapped the pins so they don’t overlap with my DAC so I should technically be able to run both on the same pi I think. If not I’ll just separate the DAC to a separate pi and the design should still hold.
Good luck - congrats on your first PCB!
Just wondering about the pin header - is this flipped around versus how a normal hat would sit on a regular Pi? To me, this looks like it would have to sit 180 degrees around from how they normally sit. Did you get stacking headers?
It will be flipped. I have it extending to the side of the pi rather than over the top of it. I’m not sure why I made that judgement call but it shouldn’t hurt anything.
As for further update I’ve tested audio output from the DAC and the amp and speakers sound fine. While I’m waiting on my board I’m trying to get the pi working as a media server how I want. I tried Max2play and logitech media server and did not like it - it was very clunky and had the overhead of a local interface where I want a headless server. I’m working with Pi Musicbox now and it seems quite a bit cleaner but I’m still working out how to get it all integrated with voice control and streaming the way I want it.
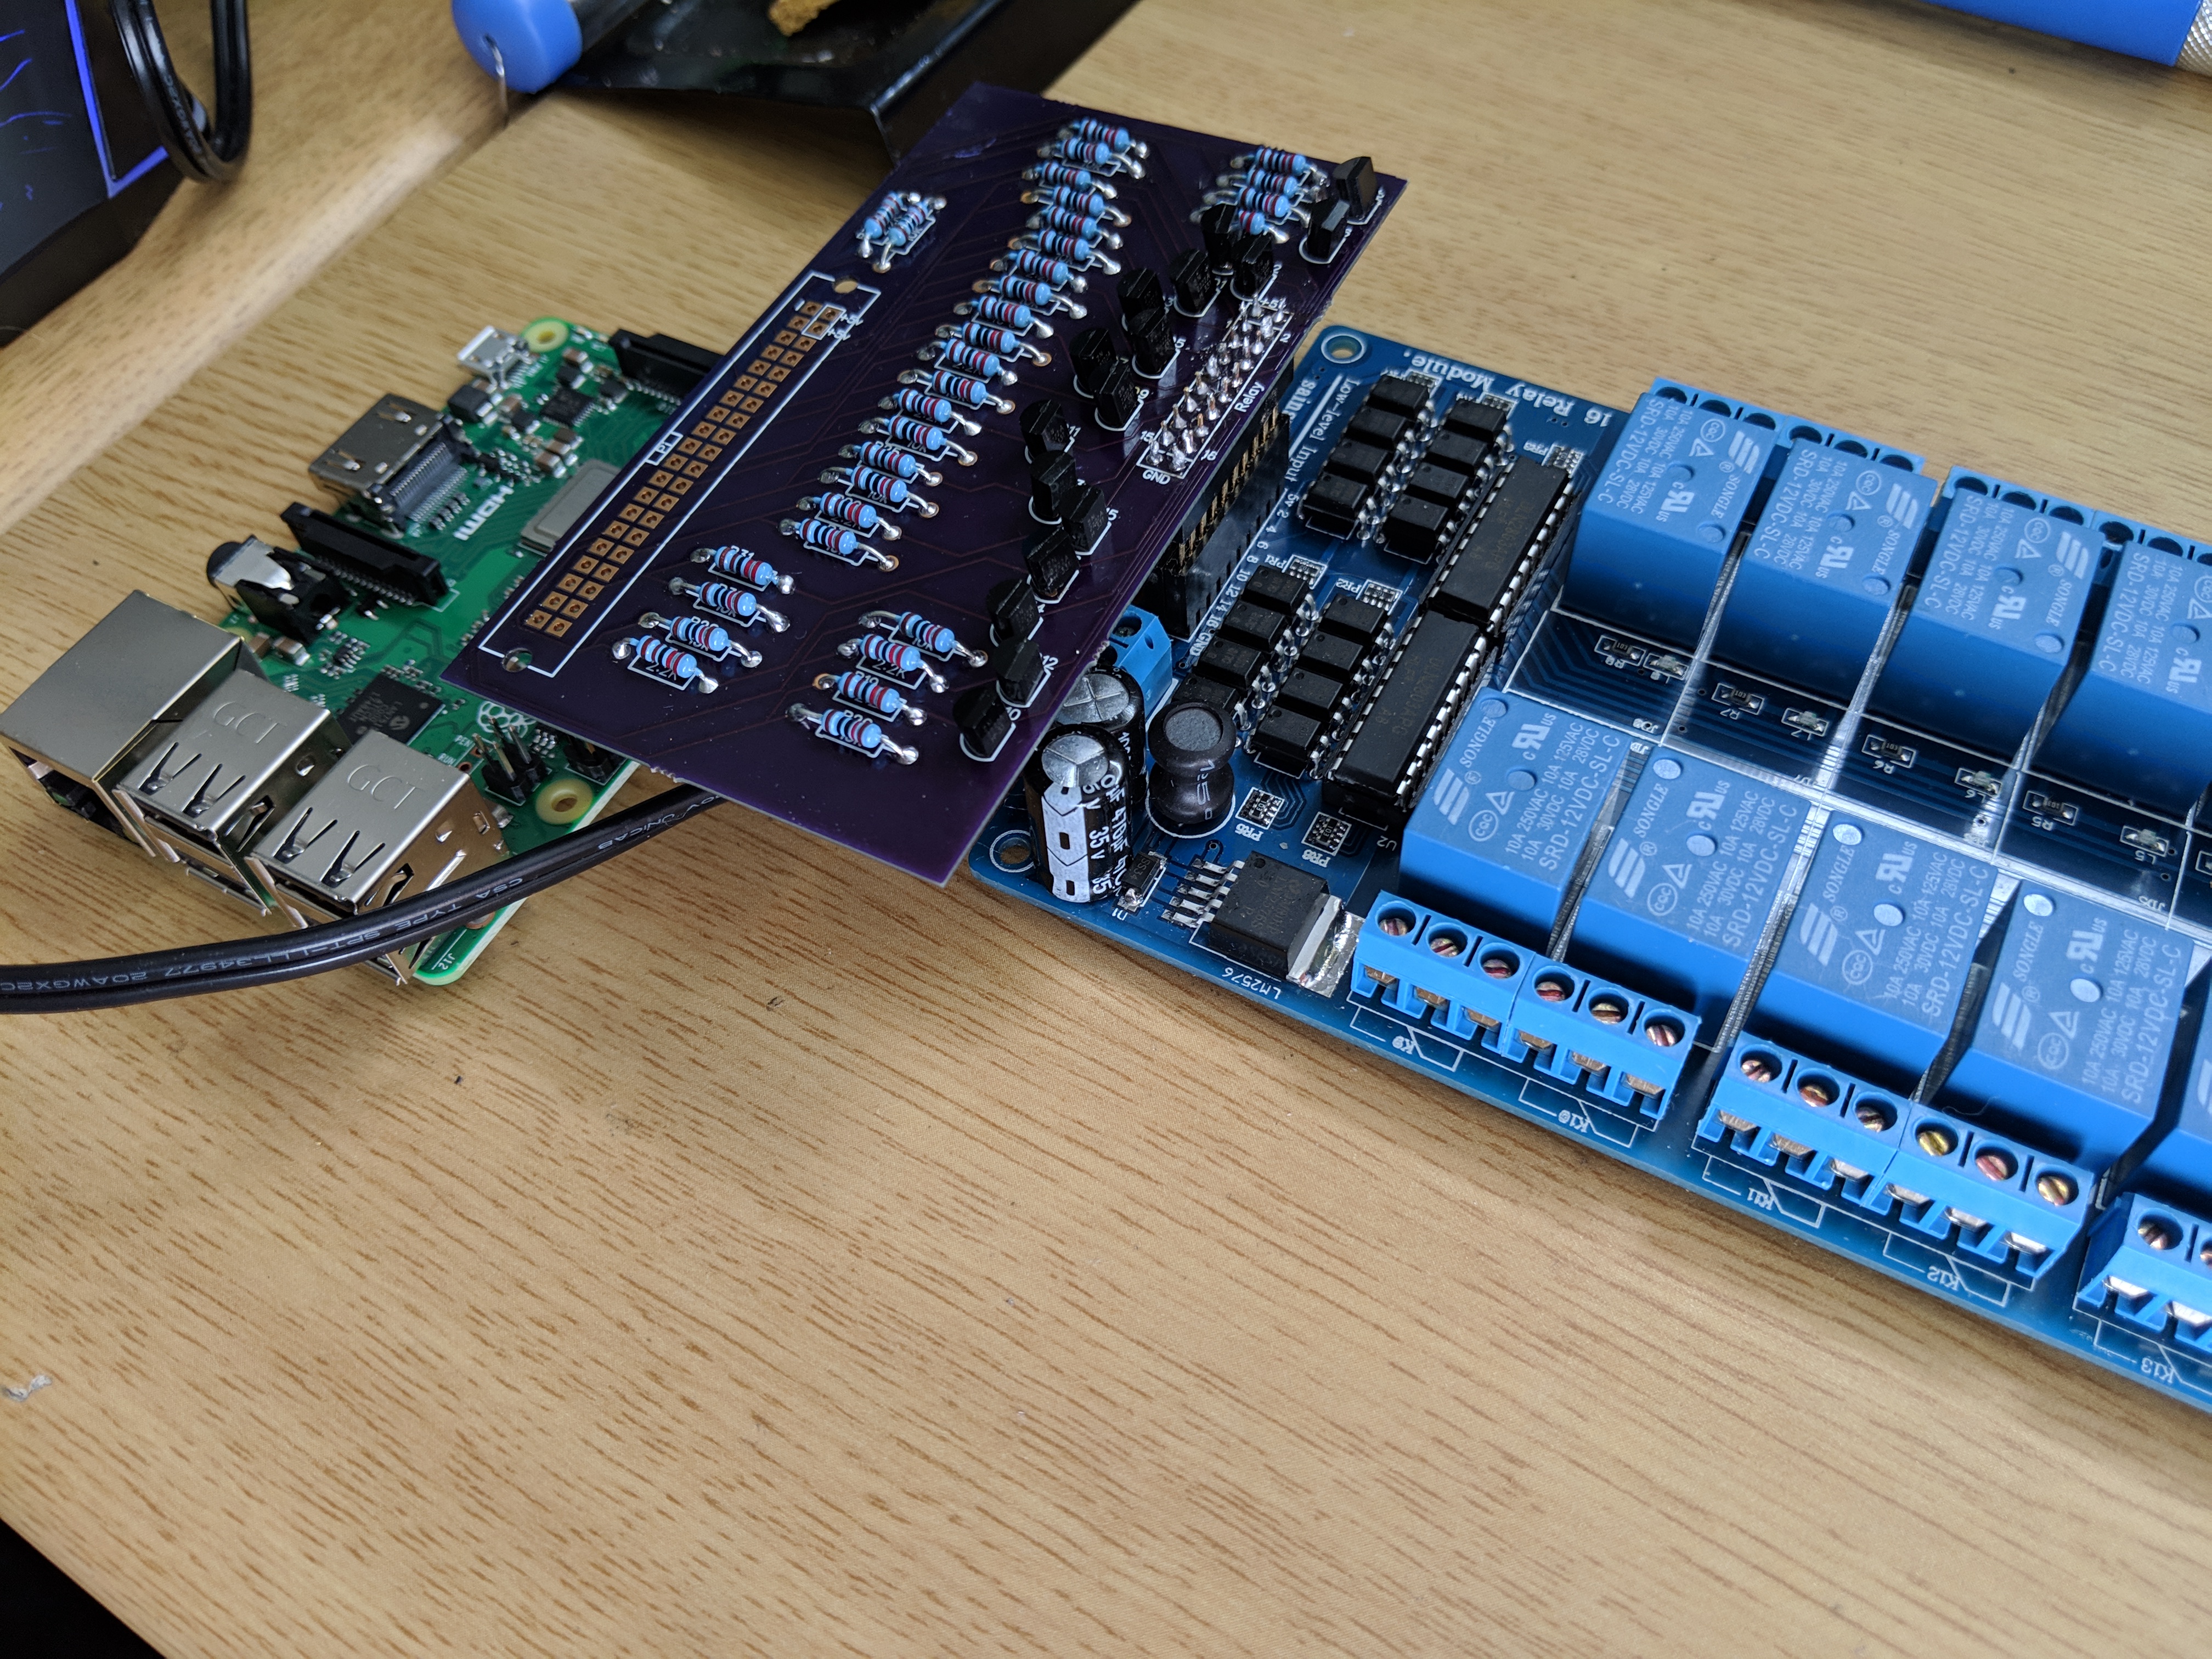
My board is in and with my lack of skills I was, with much difficulty, able to solder it. The transistors were extremely difficult for me (newbie at soldering + familial tremor in hands + very small, close-together pads). I used a multimeter to check my efforts and redid most of the transistors several times. I ran into a problem with my design - I didn’t factor in the capacitor height on the relay board so it doesn’t stack cleanly. I had to add in some stacking headers and that leaves the leads exposed a bit because they are extra tall… not sure if I should trim or what.
Only thing left is to add the headers for the pi and code it up (that last part is my domain).
As for the player, I’ve started from scratch with a plain install of raspbian stretch lite and I added Mopidy. Between support for MPD and UPNP/DLNA it works pretty well. I added HomeAssistant because OpenHab’s MPD support is gone in version 2 and found it a lot easier to work with. I’ve successfully streamed from multiple Windows PCs and multiple phones. I plan on setting up some pre-defined streams and also copying my CD library to a network share and accessing it via SMB.
I’m trying to decide… I’ve actually got it where all this can technically run on a single pi but I may separate and use multiple. If nothing else maybe the HomeAssistant should run separate.
I also grabbed a 2u server chassis to mount it all in. I plan on using the extra space to mount another pi or 2 for other purposes in the same box.
This is a brilliant thread. Thanks for sharing your project, and nice work on the PCB!
Whole-home audio has been on my list of video topics for a long time. I have a few different objectives for it, including:
Distribution of music from a central point out to each room
Pickup of audio from each room and processing at a central point (imagine a voice assistant that is the whole house, not just an object in the house)
Pickup of audio from one point and real-time output at another point (imagine telling your home automation system that you’re in the kitchen, but you want to listen to what’s happening in the back yard while the kids are playing out there)
I’ve gone over a number of different architectures for this. My plan had been to centralise a couple of amplifiers and use a commercial 8x8 audio switching matrix to select speakers around the house and feed them from different sources, so that zones could either play different audio or be bound together.
However, the idea of streaming to distributed head units is also very interesting. My friend Jan Schmidt (who is a GStreamer maintainer) almost has me convinced that streaming is the way to go. Here’s a video of a talk he did a couple of weeks ago about audio streaming and home automation. Near the end it includes a cool demo of selective audio pickup using a microphone array, with him talking from one side of the device and me calling out from the audience on the other with our voices separated based on point of origin:
Using a cheap relay board controlled by either a Pi or an Arduino is a brilliant idea though, so now I’m leaning back towards central amps and a switch!
I’m going to watch your project with a great deal of interest