Hey there from the States! I have been binge watching all of the superhouse videos. Being as they were created over a number of years time, I know that tech as well as hardware options have changed. I am in the beginning stages of automating my property that we are developing. My wiring plans involve running Cat6 to everything while I have trenches open… out to front gate, well house, storage sheds, shop, and of course the house. I will automate lighting and gate control out front and anything else I can come up with in other areas.
I know you have talked about lots of stuff in the videos but I also know your control methods have changed. Am I on the right track in installing a Pi as a controller with MQTT and Node-RED and then using Ether10’s for local automation at each location like gate, shed, etc.? I am new to the Arduino thing and am heavily researching MQTT and Node-RED. Lots of learning to do.
ALSO, you were doing PoE. I plan to do PoE injection from a master panel in the core of my star topology. Sound like I am on track?
Anything you would do different if you could start over? I have a clean slate.
Sounds good to me. I am still learning and followed SuperHouse. I like what he has done but like you said his videos are pretty old. I am unsure how to proceed. I like what he has done with the momentary light buttons. I am unsure of the Node-RED. I was hoping since he started his store he would be more active that he has in the past. I am kind of stuck on proceeding and looking for alternatives. Again, I like what he has done, but like you don’t know if would better to look for more up to date way of doing things or if this would be the way to go. I do agree with not using wifi for controlling things for security reasons. I am sorry I am no help to you.
I believe that the majority of his design is still valid and will remain so for a very long time. The topology has not changed but the hardware that utilizes it has. For instance, it used to require ether tens at the end points with shields for networking. Now, for the most part, as it appears to me though I may have missed something, is that all the CAT cabling is essentially switching control and the brain is still E10 but only requires 1 in each breaker panel. The Pi is the newer update as a controller and with that comes the beauty of the automation… nearly unlimited monitoring expansion.
The open source community is really getting all over the IoT stuff and Node-RED is next iteration of communication interlinking for dummies like me. What he has bitten off with not only doing the automation experimentation but in developing custom shields and hardware to accomplish it… Not to mention all the video and editing that goes with it… oh yesh, and did I mention the store he added? Well that is just a he’ll of a lot to do! Lol. The software will outrun us all but his layout and setup is great. I just gotta figure out how to program Arduino so I understand how that interfaces with the Pi.
If all the walls and trenches are still open run as much cat6 as possible everywhere; and obviously with a “home run” back to a central cabinet. They are just copper wires so you can decide on the endpoints later.
I believe Jon used Ether10 modules as endpoints and a Ether10 as the master relay controller. Raspberry Pi as the server. Later the smarts moved from the wall switches to the central EtherMega rack mounted. You dont have to worry about all that quite yet if you are still wiring. I would even run Ethernet to the lighting in the ceiling if possible. Then you are future proof and can decide later.
You can have a lot more smarts with a controller in each room’s light switch - motion sensor, light sensor, temp/humidity, ir repeater, and you could even get crazy and a light switch or two!
While you are installing cat5e to all of the out buildings be sure to run at least one extra cable. It wouldn’t hurt to add one extra for good measure (3) to the points that would be hard to get to in the future. Cat 5e cable is cheap by the 1000ft roll in ebay. Be sure to buy different colors to help identify the different wires. You can also run cameras over cat 5e and if you need to add POE you might need extra wires. Also, if you need an extra arduino to run a dedicated item, don’t forget the tiny. It’s a bit harder to program but their only about $3 US each. Don’t forget to run extra cat5e cable for ceiling mounted occupancy sensors. You can buy cheap low voltage sensors everywhere. You need them mounted at all entrances to a room. I installed one over my kitchen sink to turn on the sink light and hot water loop. I also installed a cat5e line under the sink for an I2c temperature sensor for my loop controller. I am also running extra cat5e to all of my light switches for AV volume controls and future upgrades. I also used that plastic flex tube for electrical wiring from my light boxes to my attic for future upgrades. I plan on mounting cheap android tablets on the wallin at strategically placed points to control my house web page and to use as an intercom and front door/security monitor. I am also wiring in microphones in each room for future voice control. Might as well put in lots of wire while you have the walls open. If you leave wire in a wall or ceiling and want to find it later, buy some cheap neodymium magnets with a hole in them (Banggood.com) and tie them to the end of the wire and staple it near the sheetrock. You can locate the wire through the wall at any time with another magnet. Remember, wire is cheap, be creative. This will provide fun for years to come as your smart home matures (and you find the time to finish all the goodies).
I’m using a pine64 for my openhab install. They are cheaper and have more resources. Also there is an install for the pine64 on the openhab site. Search youtube for the install directions for openhab, mosquito and node red, it’s really great. The pine64 is guaranteed by the mfg to be produced until at least 2022. They also sell a rock64 that is made for use in audio situations, like a media server. BTW, they are Pi pin compatible. and can use all Pi shields and are well supported on the forums. They also sell a line of stripped down specialty modules that are really kool.
I have bought 2 different colors of Cat cable and a roll of direct bury stuff to do a chunk of the outside stuff. The non UG cable will go in conduit to wherever it is going. I am running it all as home runs to a communication cabinet of some sort. I bought termination panels for the CAT cable and also bought a 48 volt power supply to do PoE with. I went with 48 volt due to the fact that I can always step it down and that one run is going.to be about 700 feet away from my panel… that is the gate area. I then decided to run 12/2 out there anyway to power some gate accessories that turned out to be stupid expensive in low voltage options. Everything I do will have at least 2 Cat cables run to it though and when I build out my shop structure I will be wiring absolutely everything with Cat cable as well as Romex. Never know what kinds of stuff I can add later.
I have a Pi that i have yet to do anything with which I figured to use with Openhab and Node-RED. Of course, by the time I get all my crap unpacked in the new house, tech may present a new toy to work with.
I forgot to mention that the house itself is a new manufactured home. I won’t be doing any automation in the form of lighting control or the likes. I do plan to add security elements and some other stuff but I won’t be adding anything that could fail and leave midwife hanging. She hates tech and won’t embrace it so leaving her world alone.is probably best if I want to stay married… lol.
Good idea to keep the Wife happy. Home harmony is much more important than home automation. Personally, I’m a bachelor so I don’t have anyone to answer to. Thank god for that since this round of “whole house remodeling” has gone on for a little over 6 years. If I was married I would either be finished, divorced (or dead). LOL!
I have started my network hub cabinet project. It is external and is in a repurposed box that has been weather protected for this purpose. Being as it is metal, I put an additional plastic box next to it that has a wireless router installed inside. I plan to change the router and externalize the antennae to get better signal path.
I am starting from scratch with all my power and network so I could do anything I want. I started with my service panel. It is overkill for service in the U.S. but I wanted lots of power for future stuff. I had to install the meter and master breakers on a panel of their own since the house will be a manufactured home and by code the meter can not be installed on the house
WHY? Because it is considered mobile because it can be easily removed and the meter has to be permanent. I built the panel but wanted it to be aesthetically pleasing. It looks like a covered train stop and will actually be finished to look like an old style stagecoach stop.
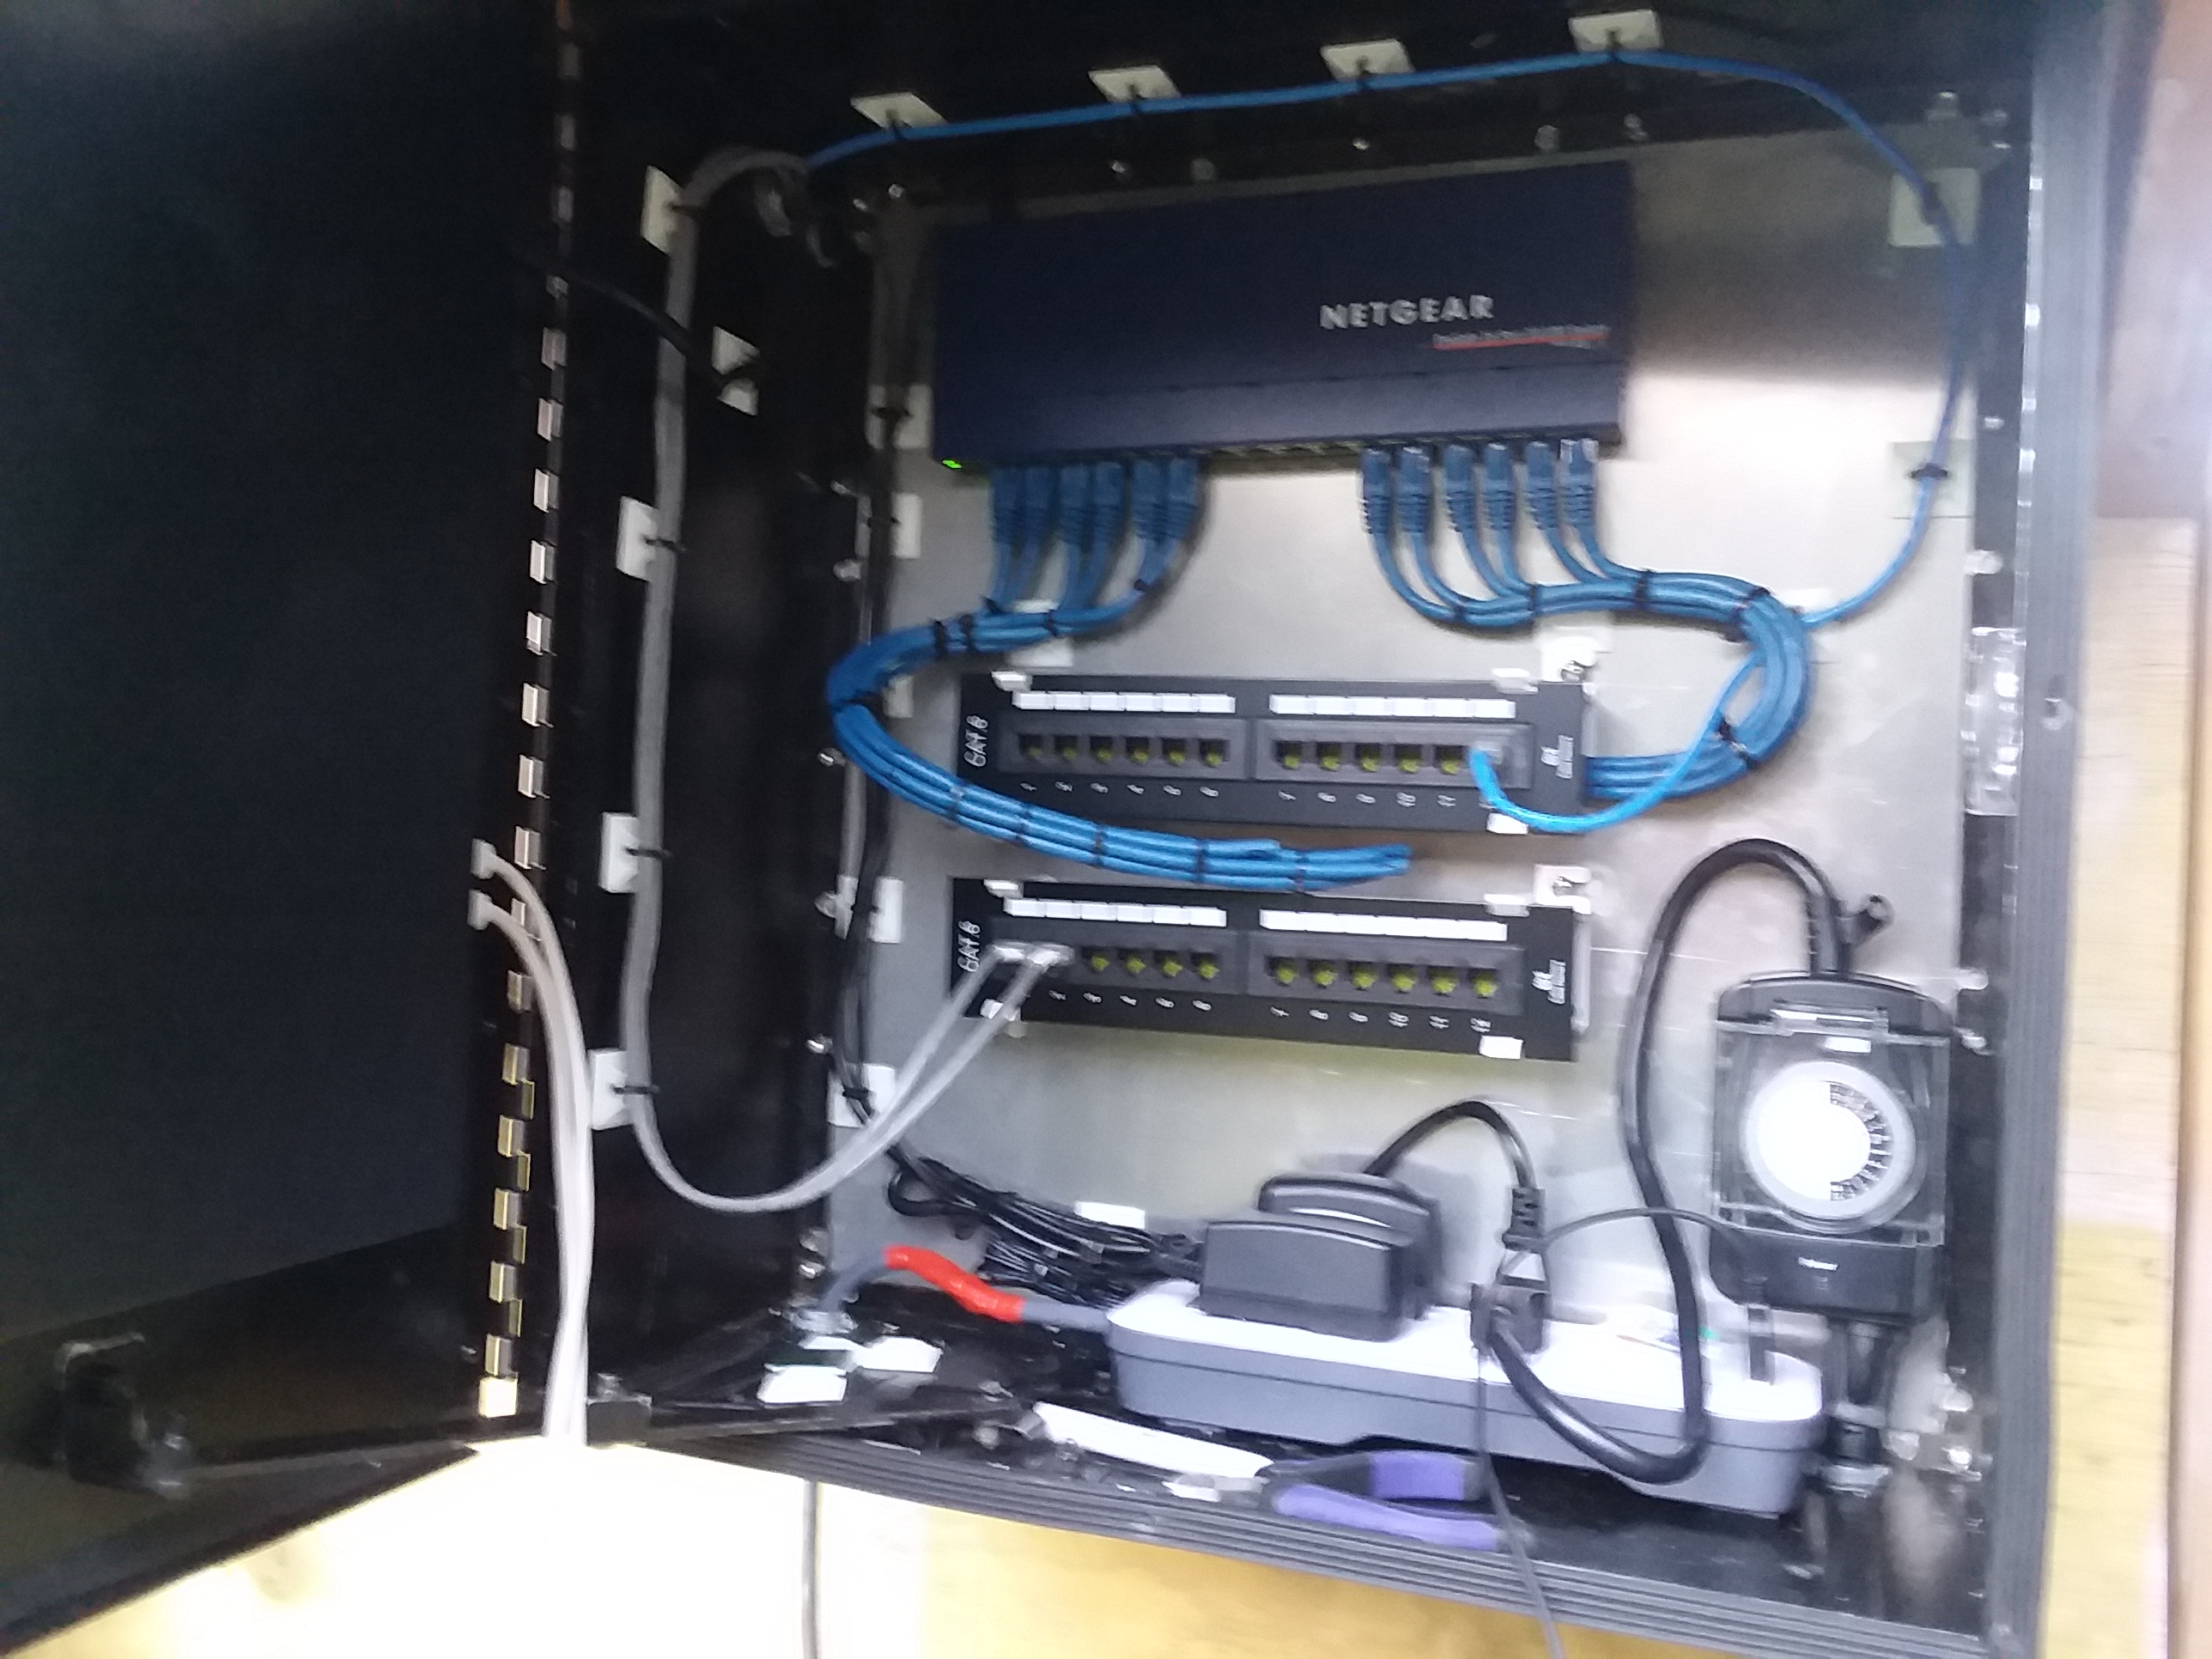
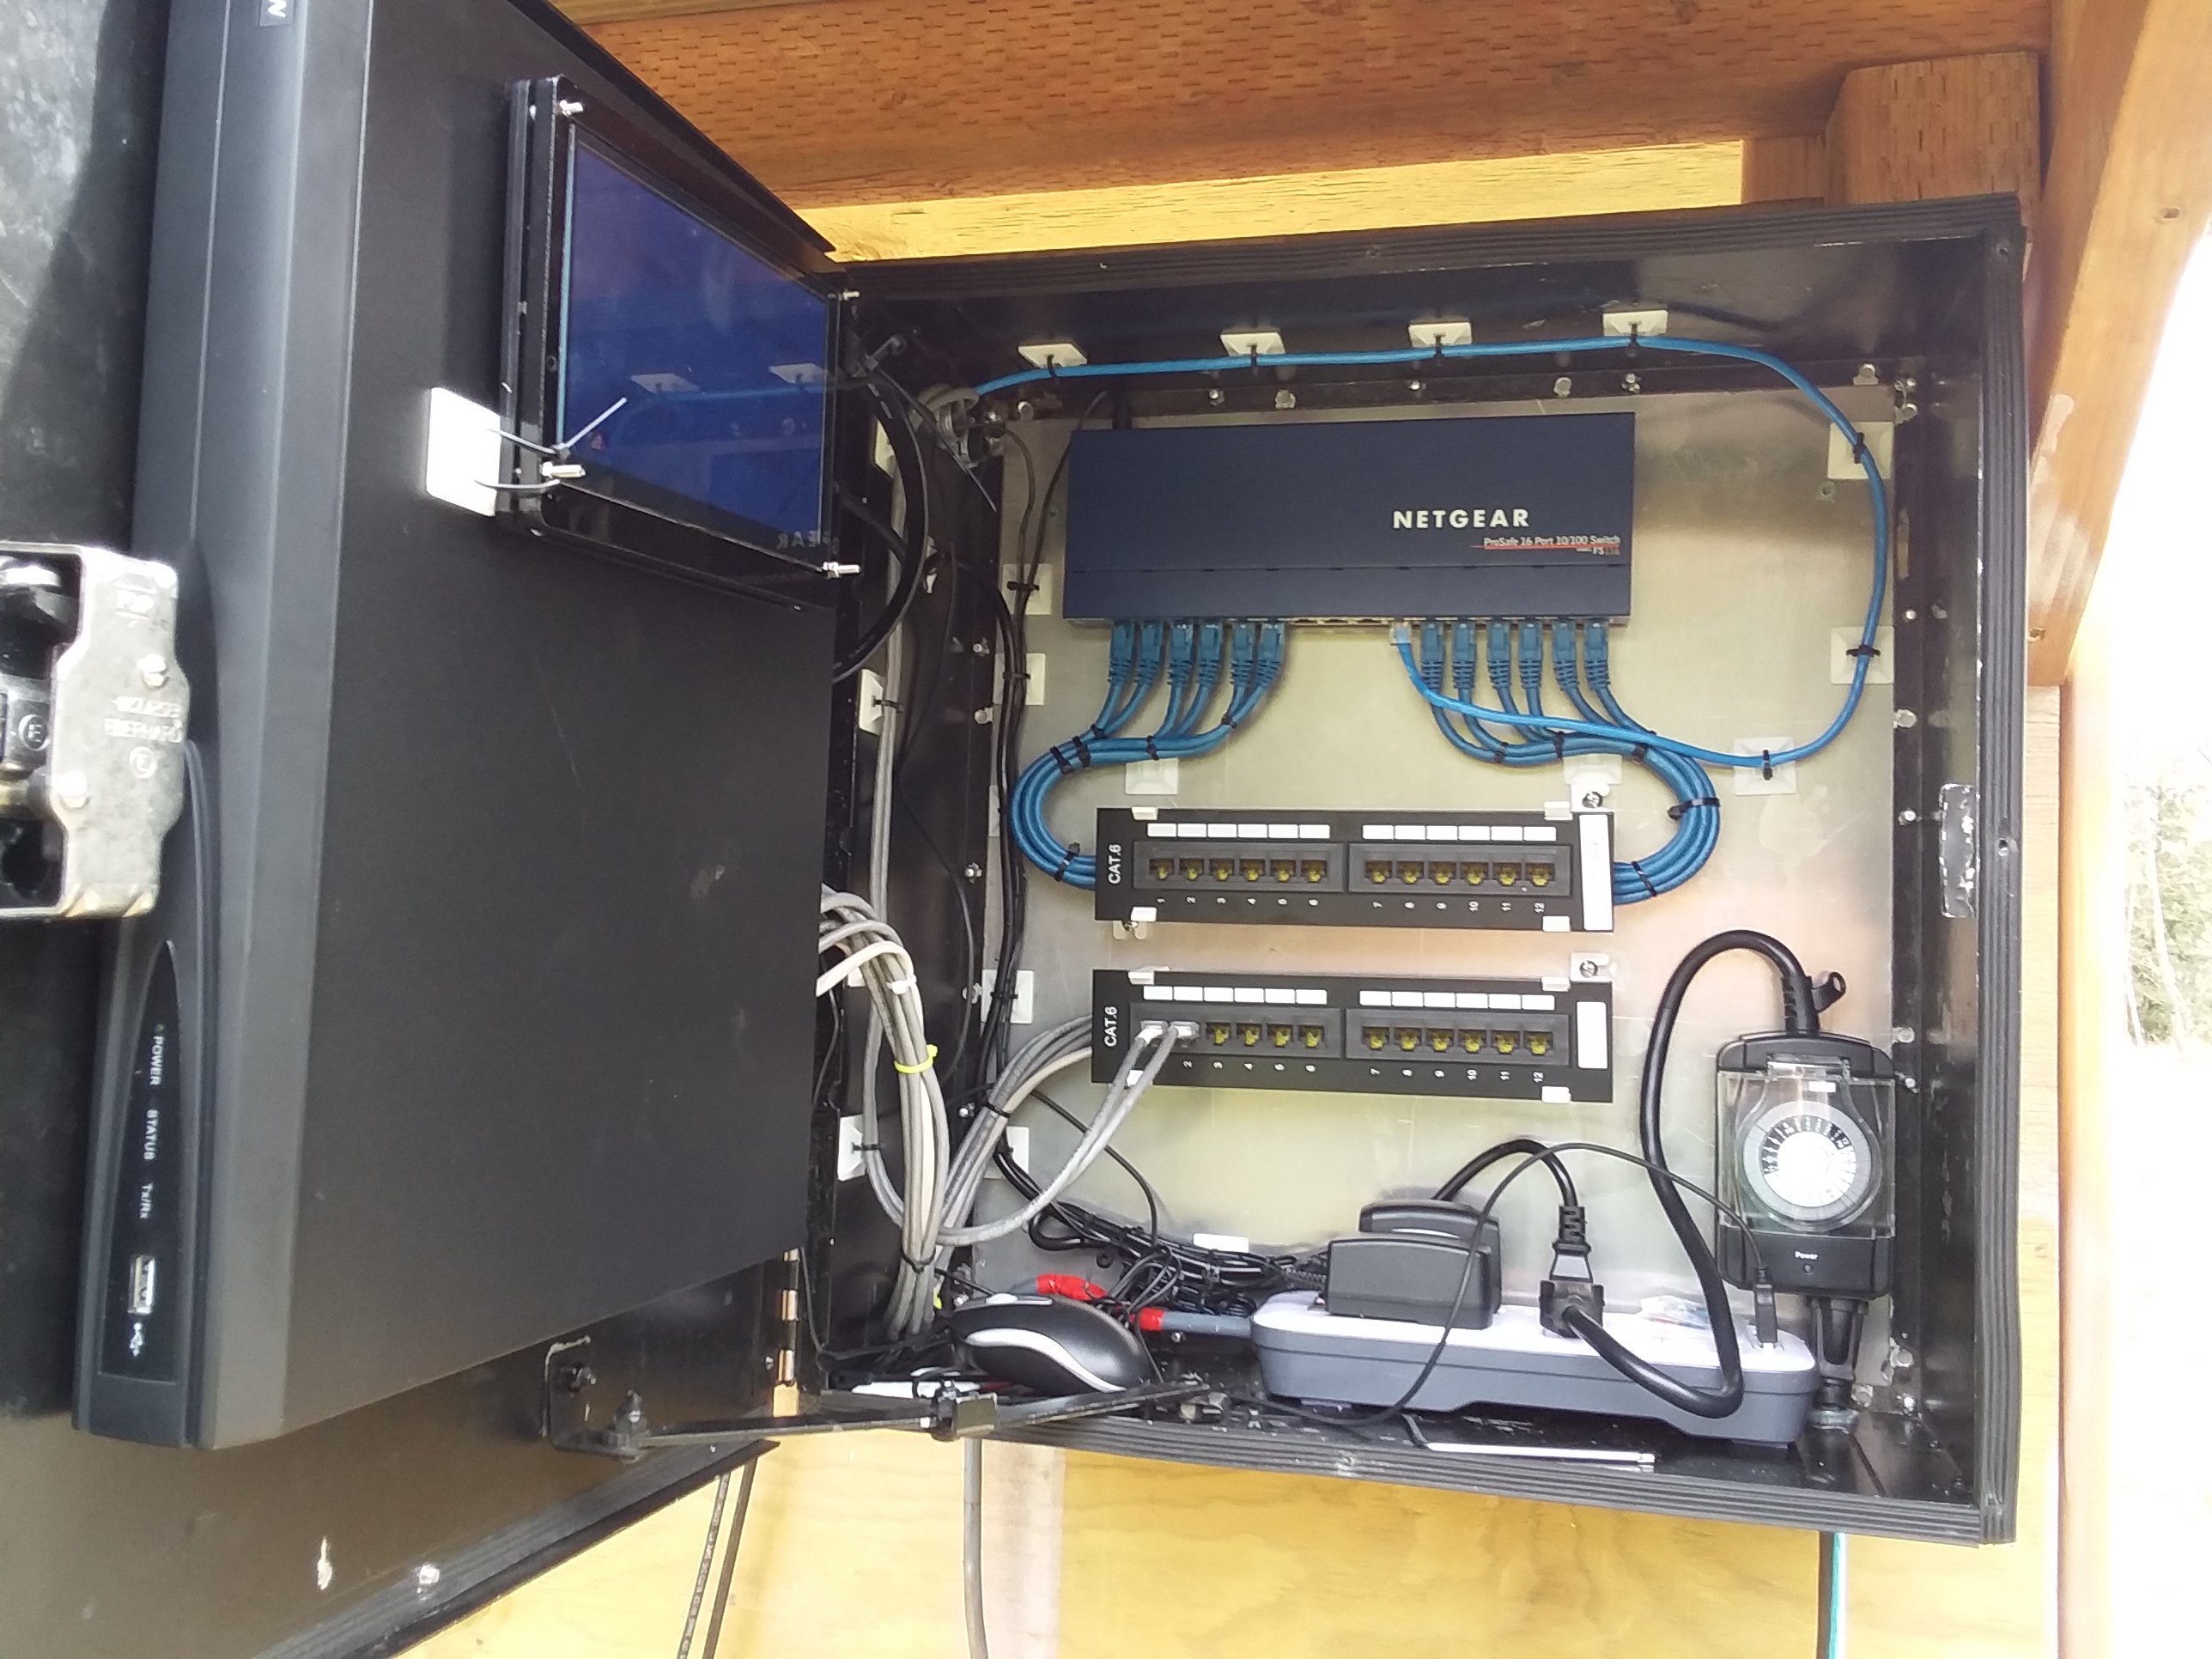
The backside has the panels and the network gear. I need to get some better pics of the back side but here is my repurposed network hub box in its mostly finished configuration.
![20180402_185923|666x500]
(upload://hRan12Rw1gaCHUnMD9exT5kdq4M.jpg)
The NVR is mounted on the door and I have a small monitor to install on that tomorrow as well as finish up the cable management for the router and the terminal blocks. The top one is for network lines and the bottom one is for POE cameras. I have an external 48v power supply to wire in and insert the power for the cameras at the block so I can keep them power free at the router. That way they can either be plugged directly into the NVR or go through a router and the NVR can be moved to anywhere on the network. Mind you, I have tons of infrastructure set up but I don’t even have a house yet. That won’t come for about 4 more months.
To add to the complexity of the coach stop structure, there are already 2 cameras installed on it and I will have a satellite internet dish mounted on the backside of the roof that will feed the wired and wireless network on that structure. I would kill for high speed internet but not even slow DSL is available in my area and cellular internet prices are stifling for even the simplest stuff. Satellite is my only option for probably many years. Let’s just say that off property camera monitoring will not really be much of a thing. Data costs and latency are a problem.
I will get some better pics tomorrow and update what I have so far. I may just do a video and post that instead for better coverage of the project.
I have been busy doing some of the preparatory work on the electrical systems that needs to be ready for when the house is placed… ya know, getting ready for final inspection and such. I have completed my stagecoach stop main panel and network master cabinet so I moved on to the wellhouse. It was existing on the property and will obviously be tied in to the house once that has been dropped in the hole. I wanted to get the low voltage stuff in there and buttoned up so it doesn’t create an issue for my electrical inspection. Technically, unless it’s considered camera or “experimental” like HAM radio, the inspectors want to get involved since low voltage stuff in Washington State is somewhat regulated since its… electrical. I guess. Whatever.
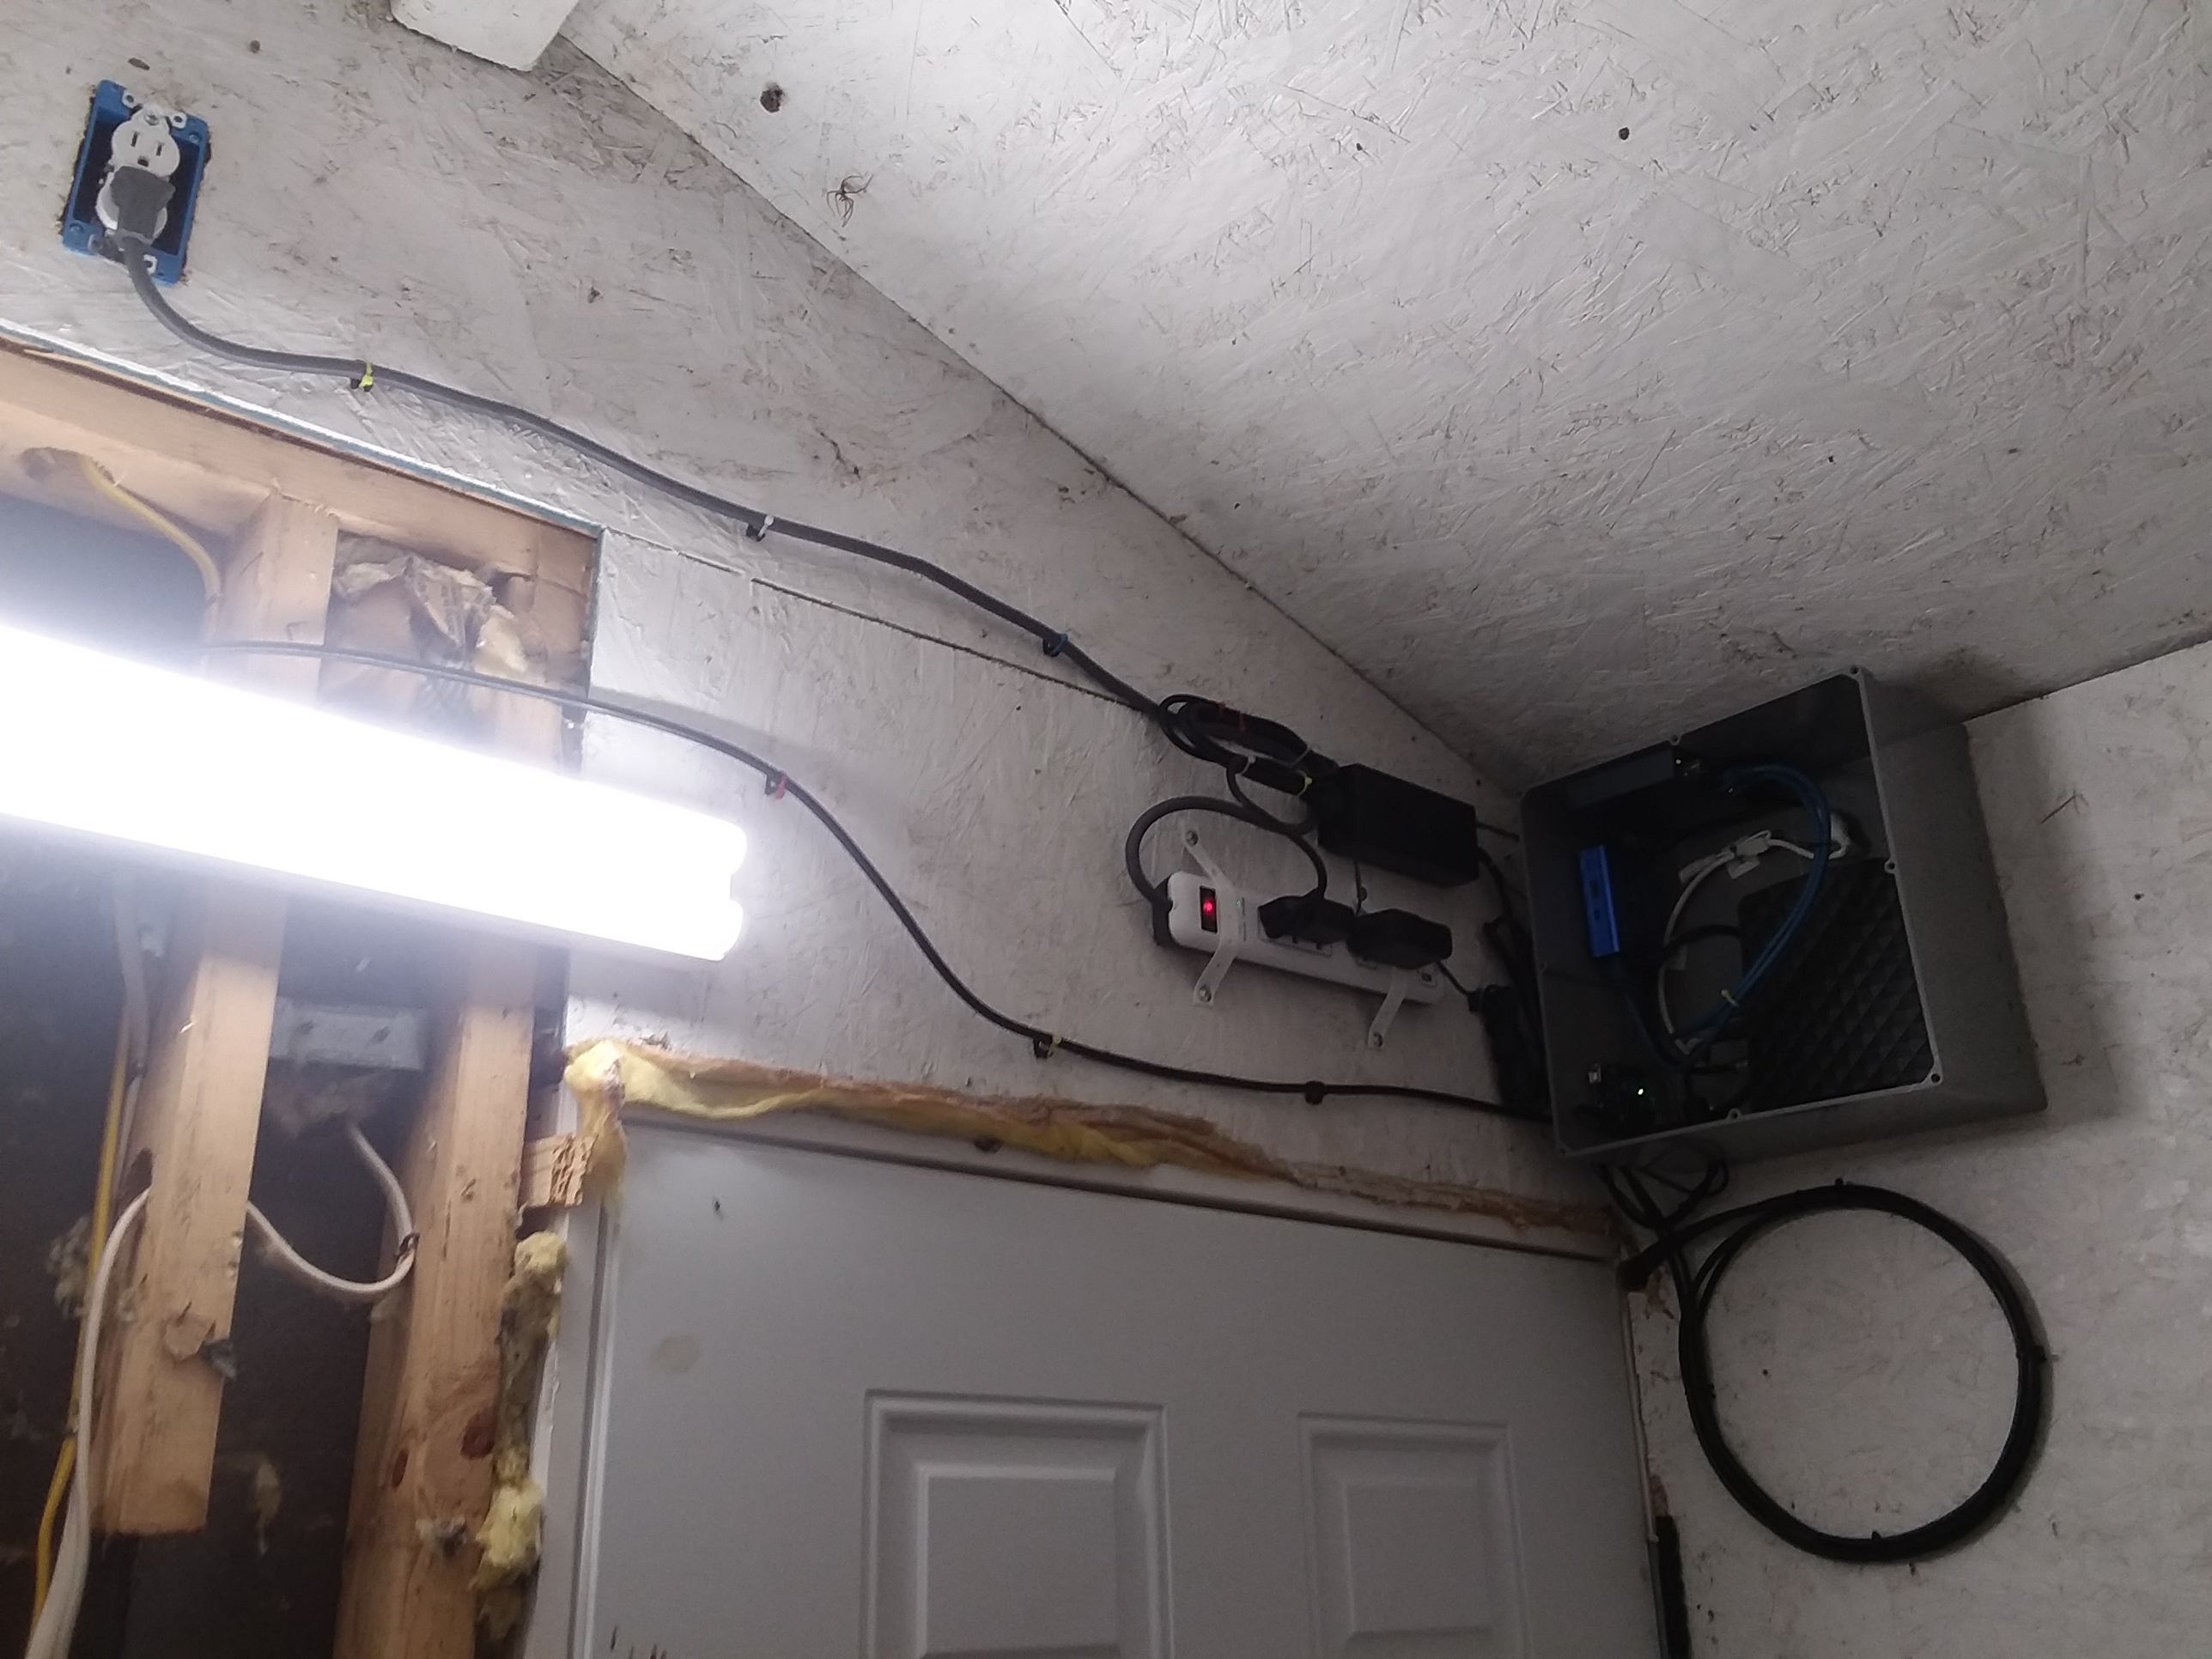
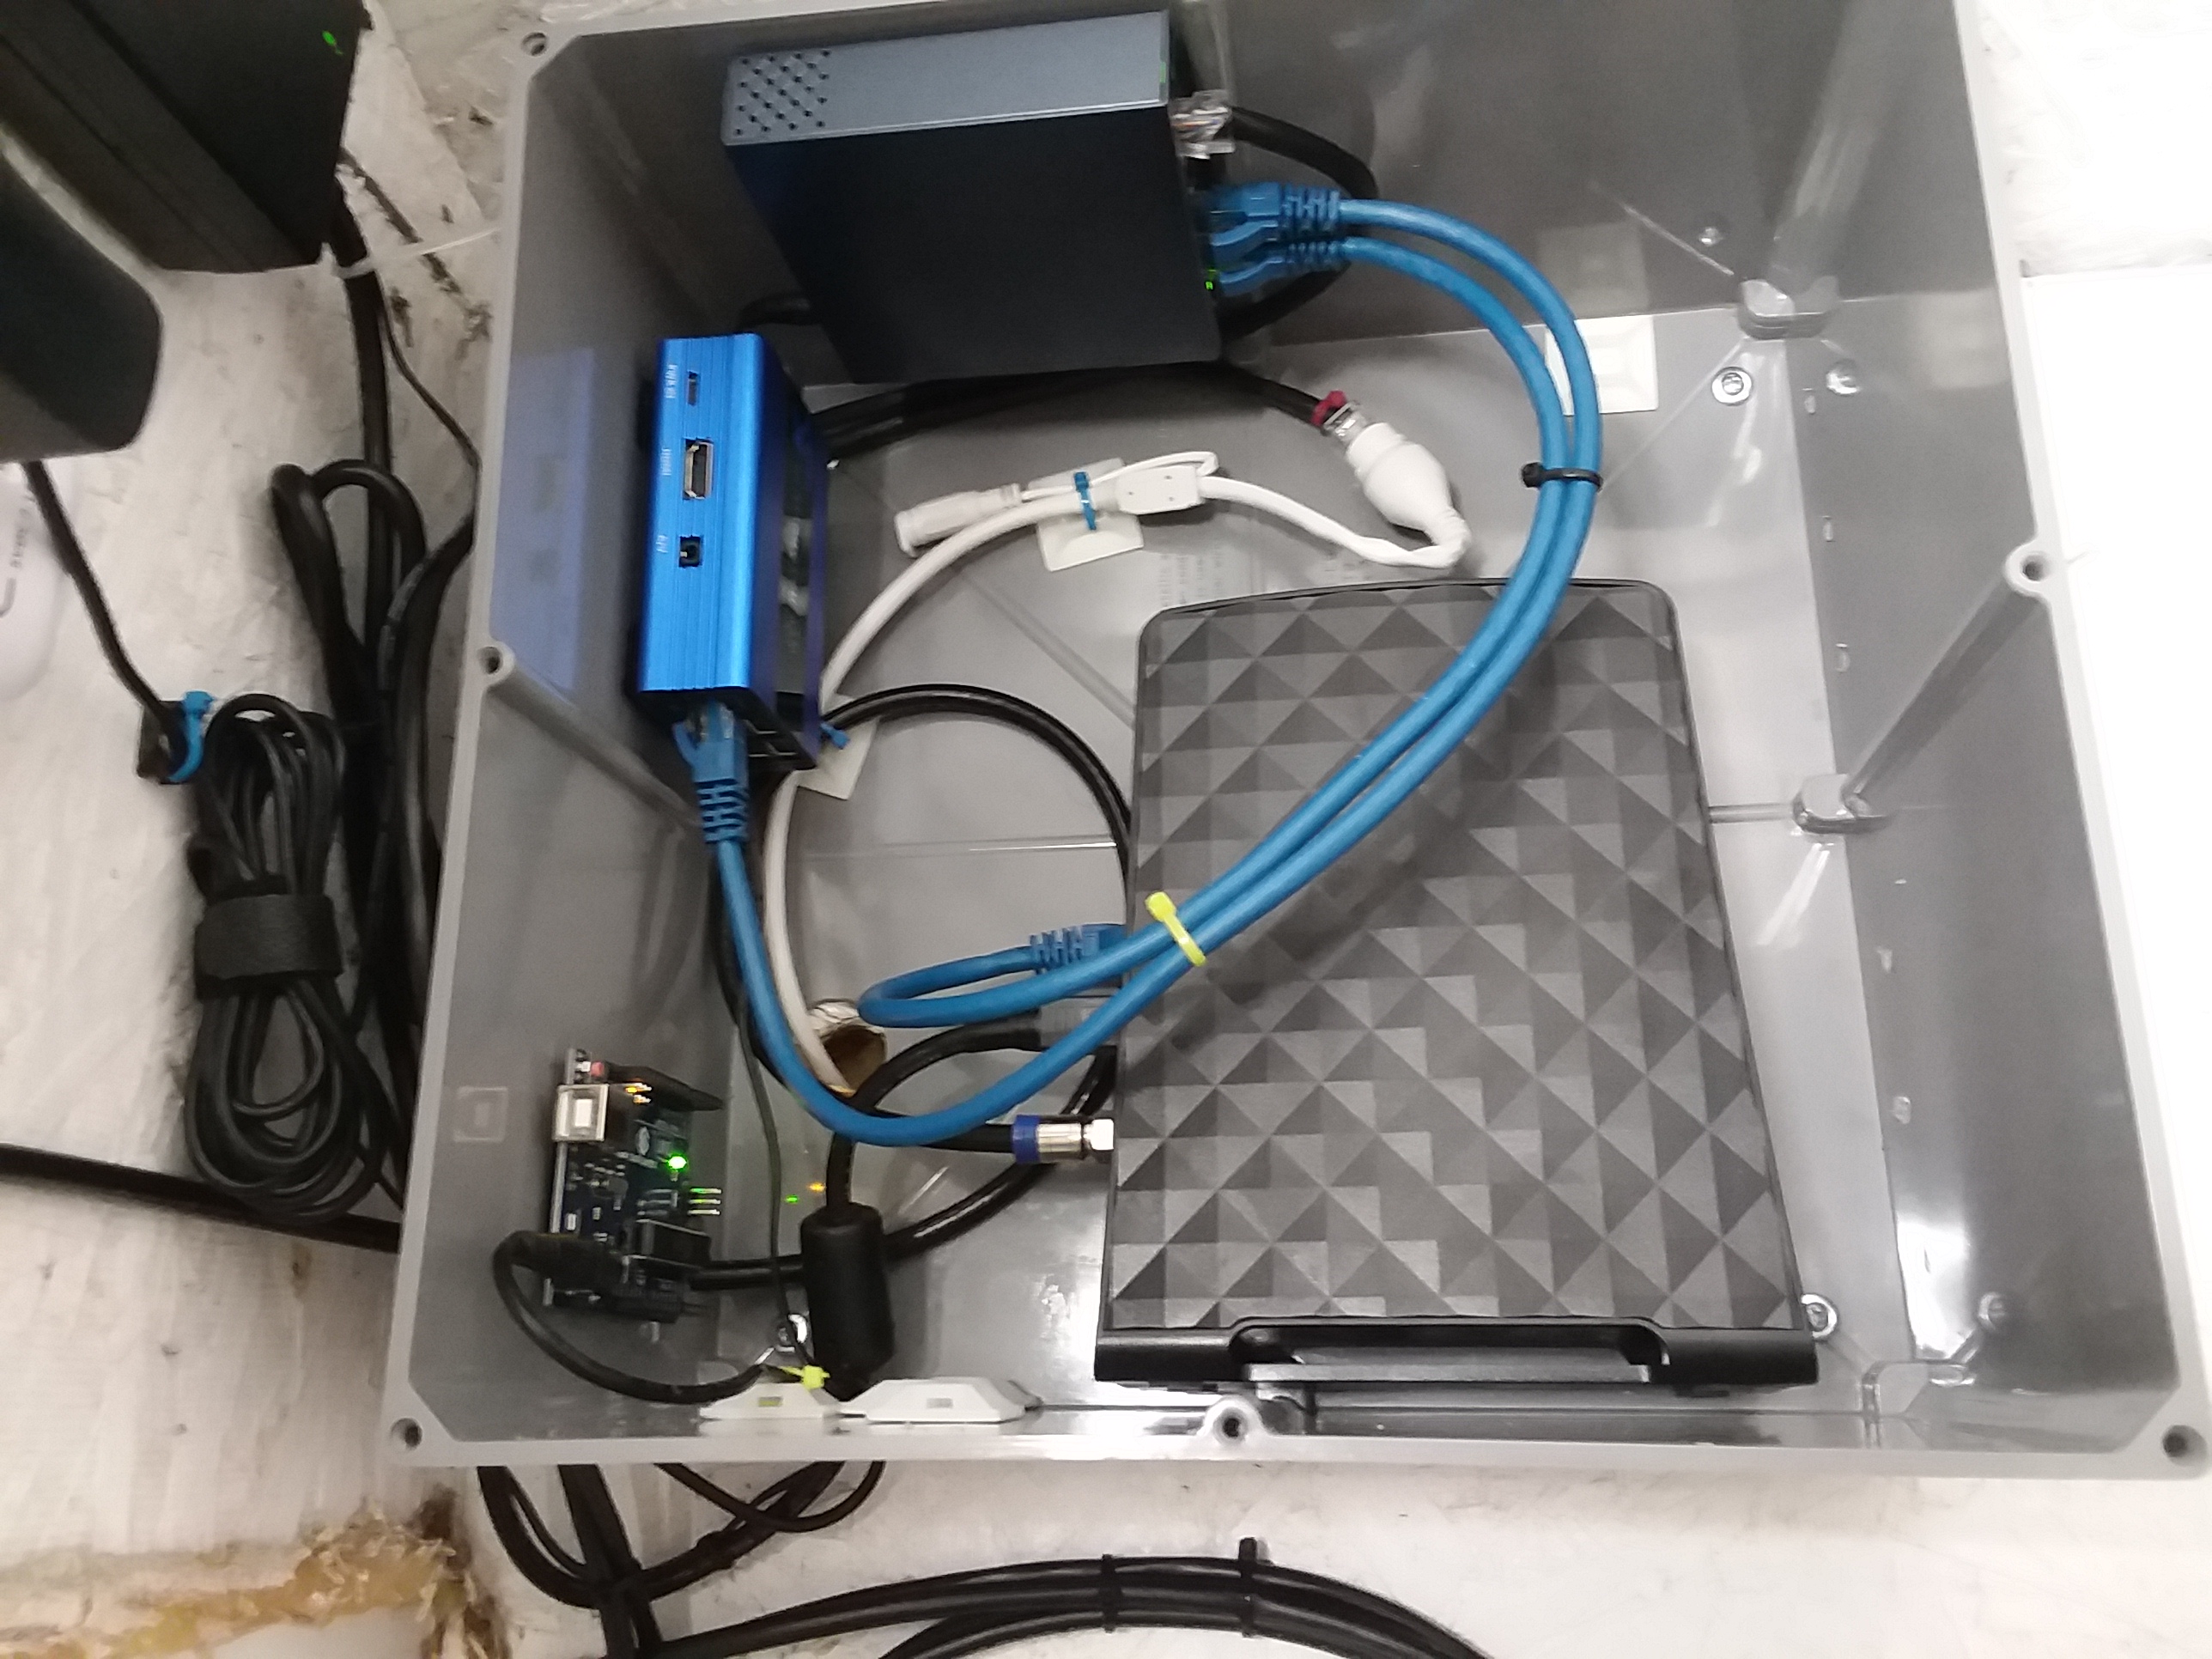
Anyway… I wired up the node cabinet in the wellhouse. Since my network is kind of a mesh topology, each one of my buildings or locations on the property is it’s own node. Each node has camera gear and hardware like an Arduino and a Raspberry Pi. I still have little idea at all how I am going to utilize it but the gear is being set up so when I figure it out, I have it. We are in a rural area that has no land based high speed internet so I had satellite internet service installed. Being as we have no structures but the well house on the property, and there was no other place with an unobstructed sky view, the well house is where the modem was installed. Today, I uninstalled it all and added it into my node cabinet.
Because it’s in a potentially humid and spider prone location, it’s in a big plastic box. I drilled a bunch of little holes for heat displacement that should keep the larger spiders out but allow any extra heat to escape. I don’t expect much of that. I put in a Pi and an Uno as well as a 5 port switch. I thought about using the router portion of the satellite modem to do the routing but if I decide to cancel that service in the future, I wanted a switch in there so there was no disruption to the network.
I have a network cable and a PoE cable brought into the cabinet as well as the camera pigtail so everything is clean. The box is located over the door so it is all out of the way.
This is an interesting thread! I love seeing pictures of people’s projects.
I totally agree with the other comments about cabling while you can, and that the cable will stay relevant for a long time. UTP cable is pretty much a universal standard for long distance fixed data connections, even if you’re not using Ethernet, so you can’t go wrong by putting it in.
Even things like motion detectors can be connected with UTP cable if you like, although they’re more commonly wired with multi-core security cable.
So grab yourself a box of Cat-5e and run it to every location that you can conceivably add something later. When we started our renovations I made several copies of the plans and drew marks all over them for where I wanted to locate switches, lights, sensors, cameras, etc, and then used hundreds of meters of Cat-5e while the building was at framing stage.
Also, make extensive notes while you’re doing it. When you put in dozens of cables it can be very hard to remember later where they all are. I took photos of all the locations where cable is terminated, so that later when the walls were sealed up I could just look at the photo and see where everything is inside the wall. It’s like having x-ray vision.
Being as my network is kind of a mesh setup, I am building diagrams as I go and marking all the wire ends with codes that tell me where they go nd whether they have PoE on them so I don’t put a camera cable into a switch. I am trying to put in at least 2 cables for every run between buildings/structures for redundancy and will be putting in 4 between locations that could have lots of data, like the house and the man cave. I will also be running wires in a redundant fashion. For instance, I have run wires between my main panel and the well house and I will run wires from the panel to the house itself but because I have open trenches between the house and the well house for water I am throwing more wire in between those two so if there is any wiring issues anywhere with those wires I have other redundant paths I can use. Not to be complicated, but it is definitely made so that it is relatively bomb-proof and I won’t have to worry about wires failing and losing connectivity between buildings on my network.
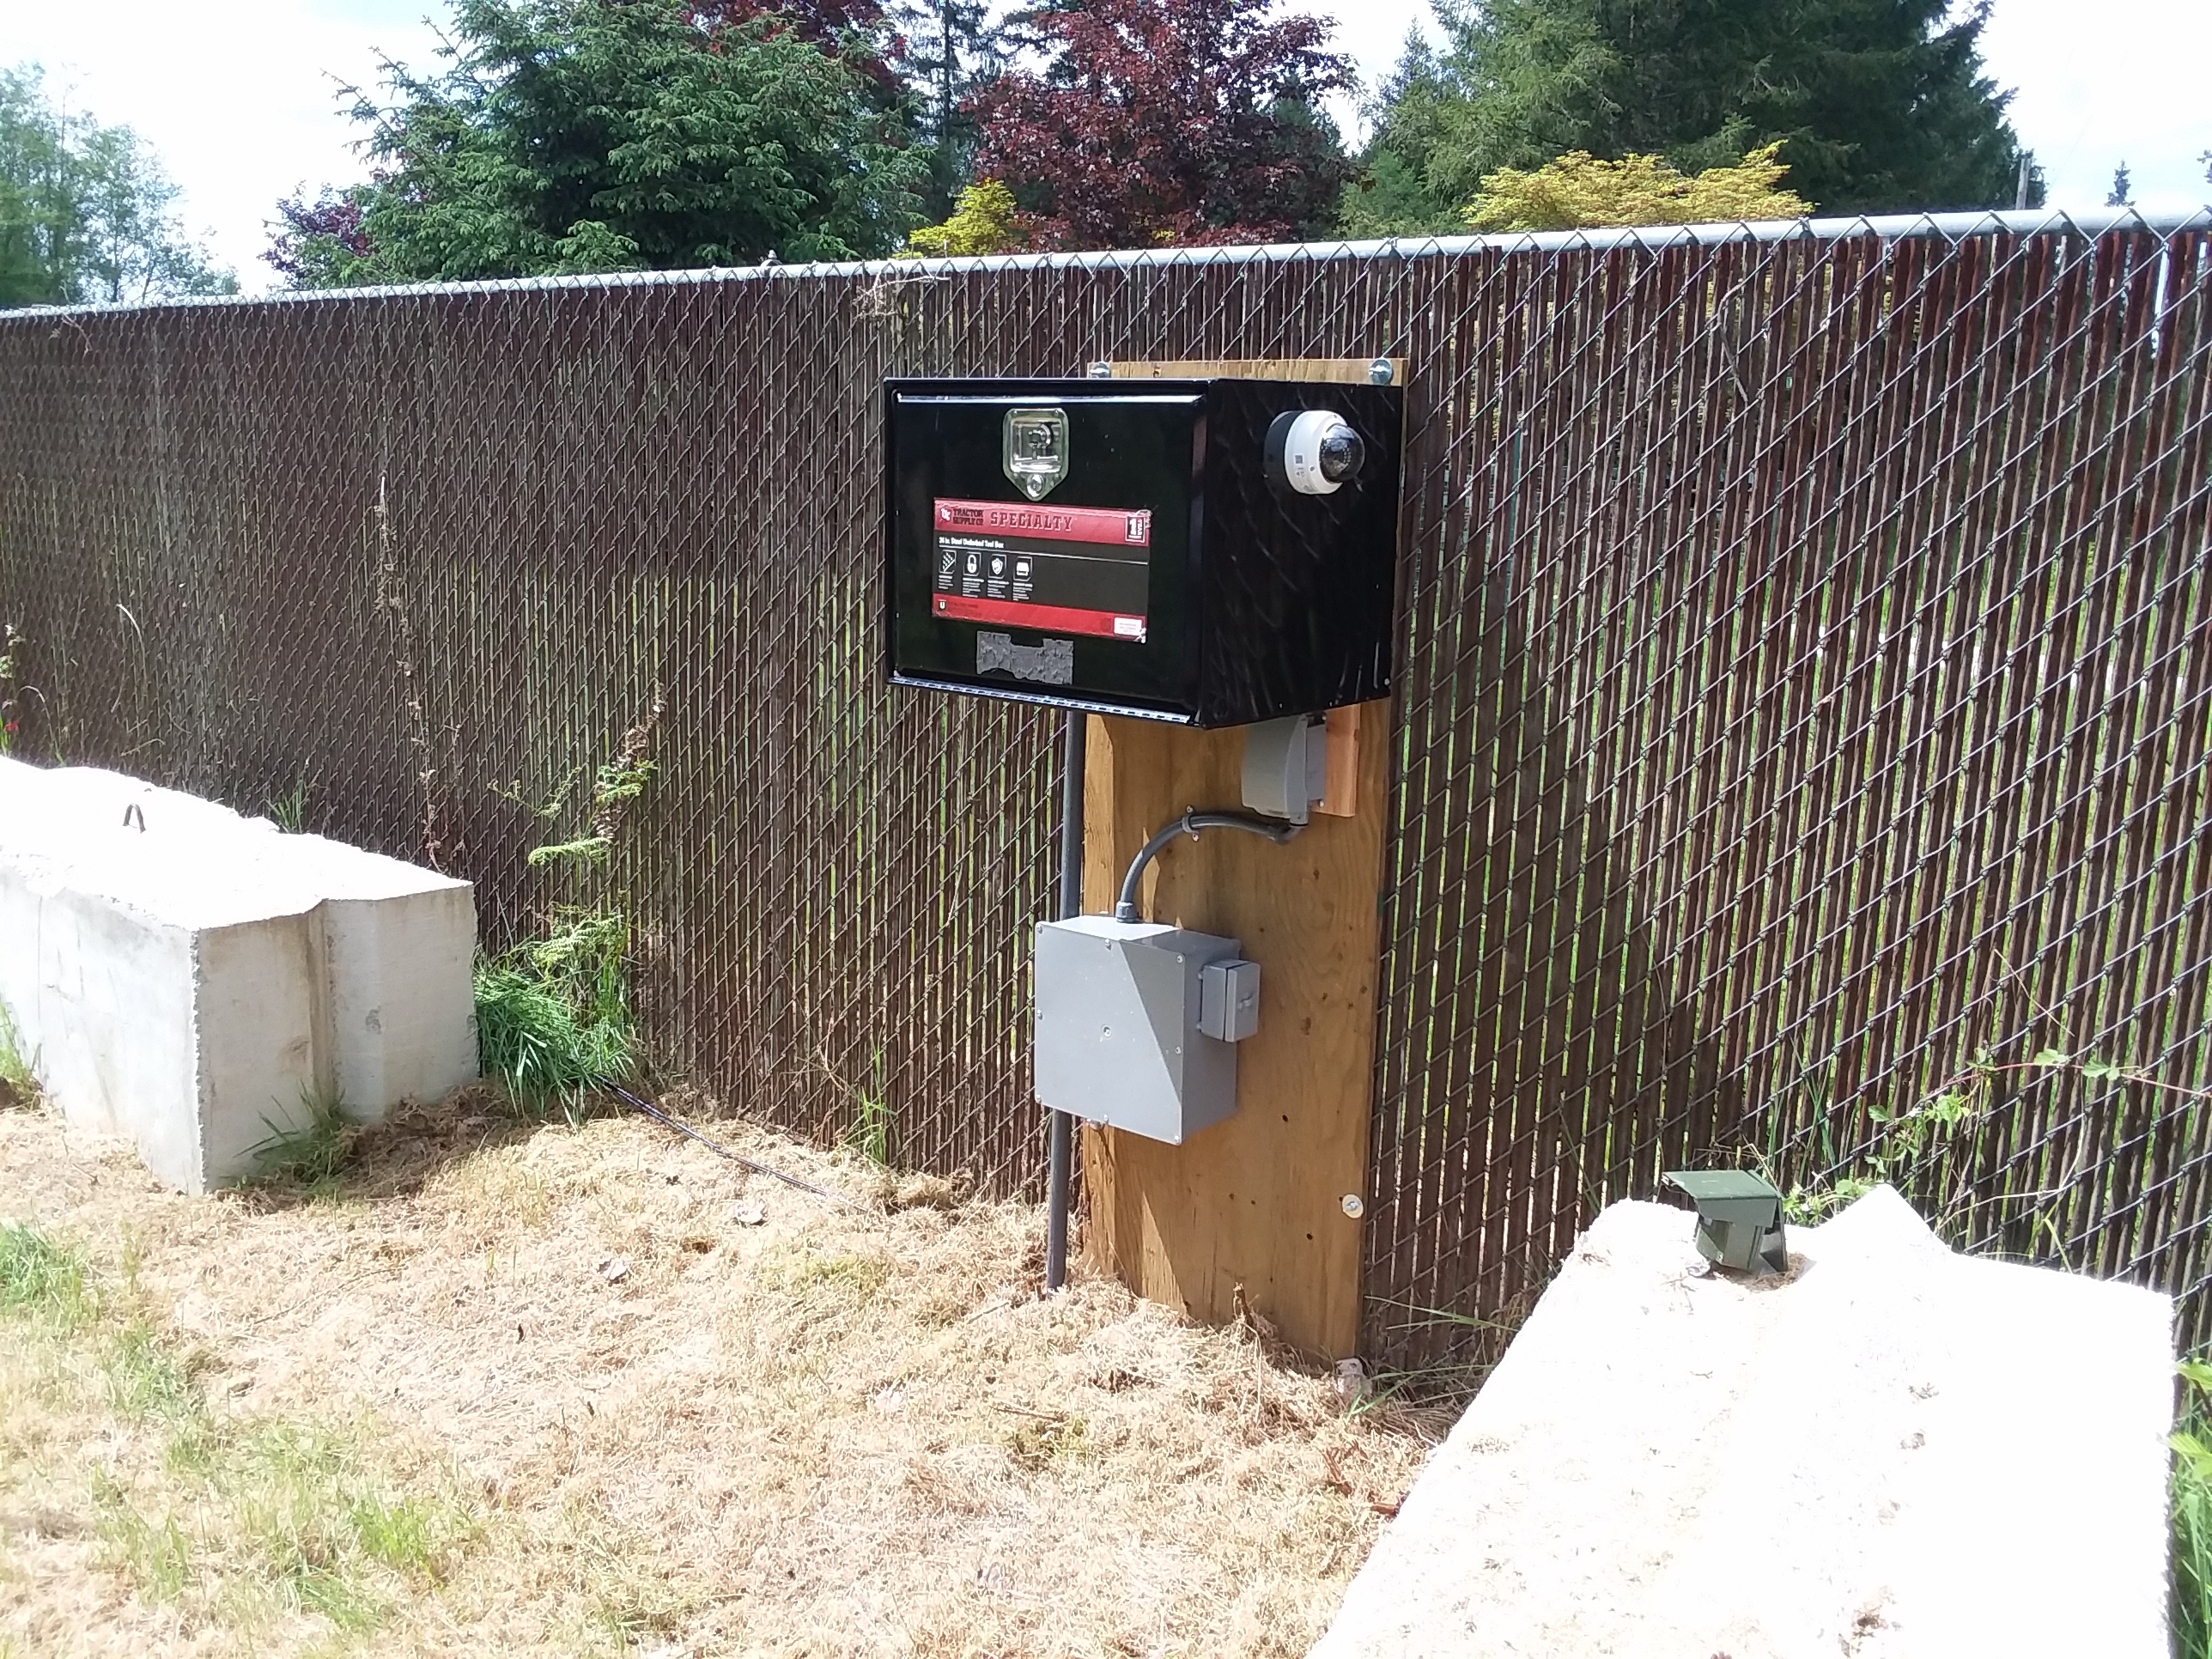
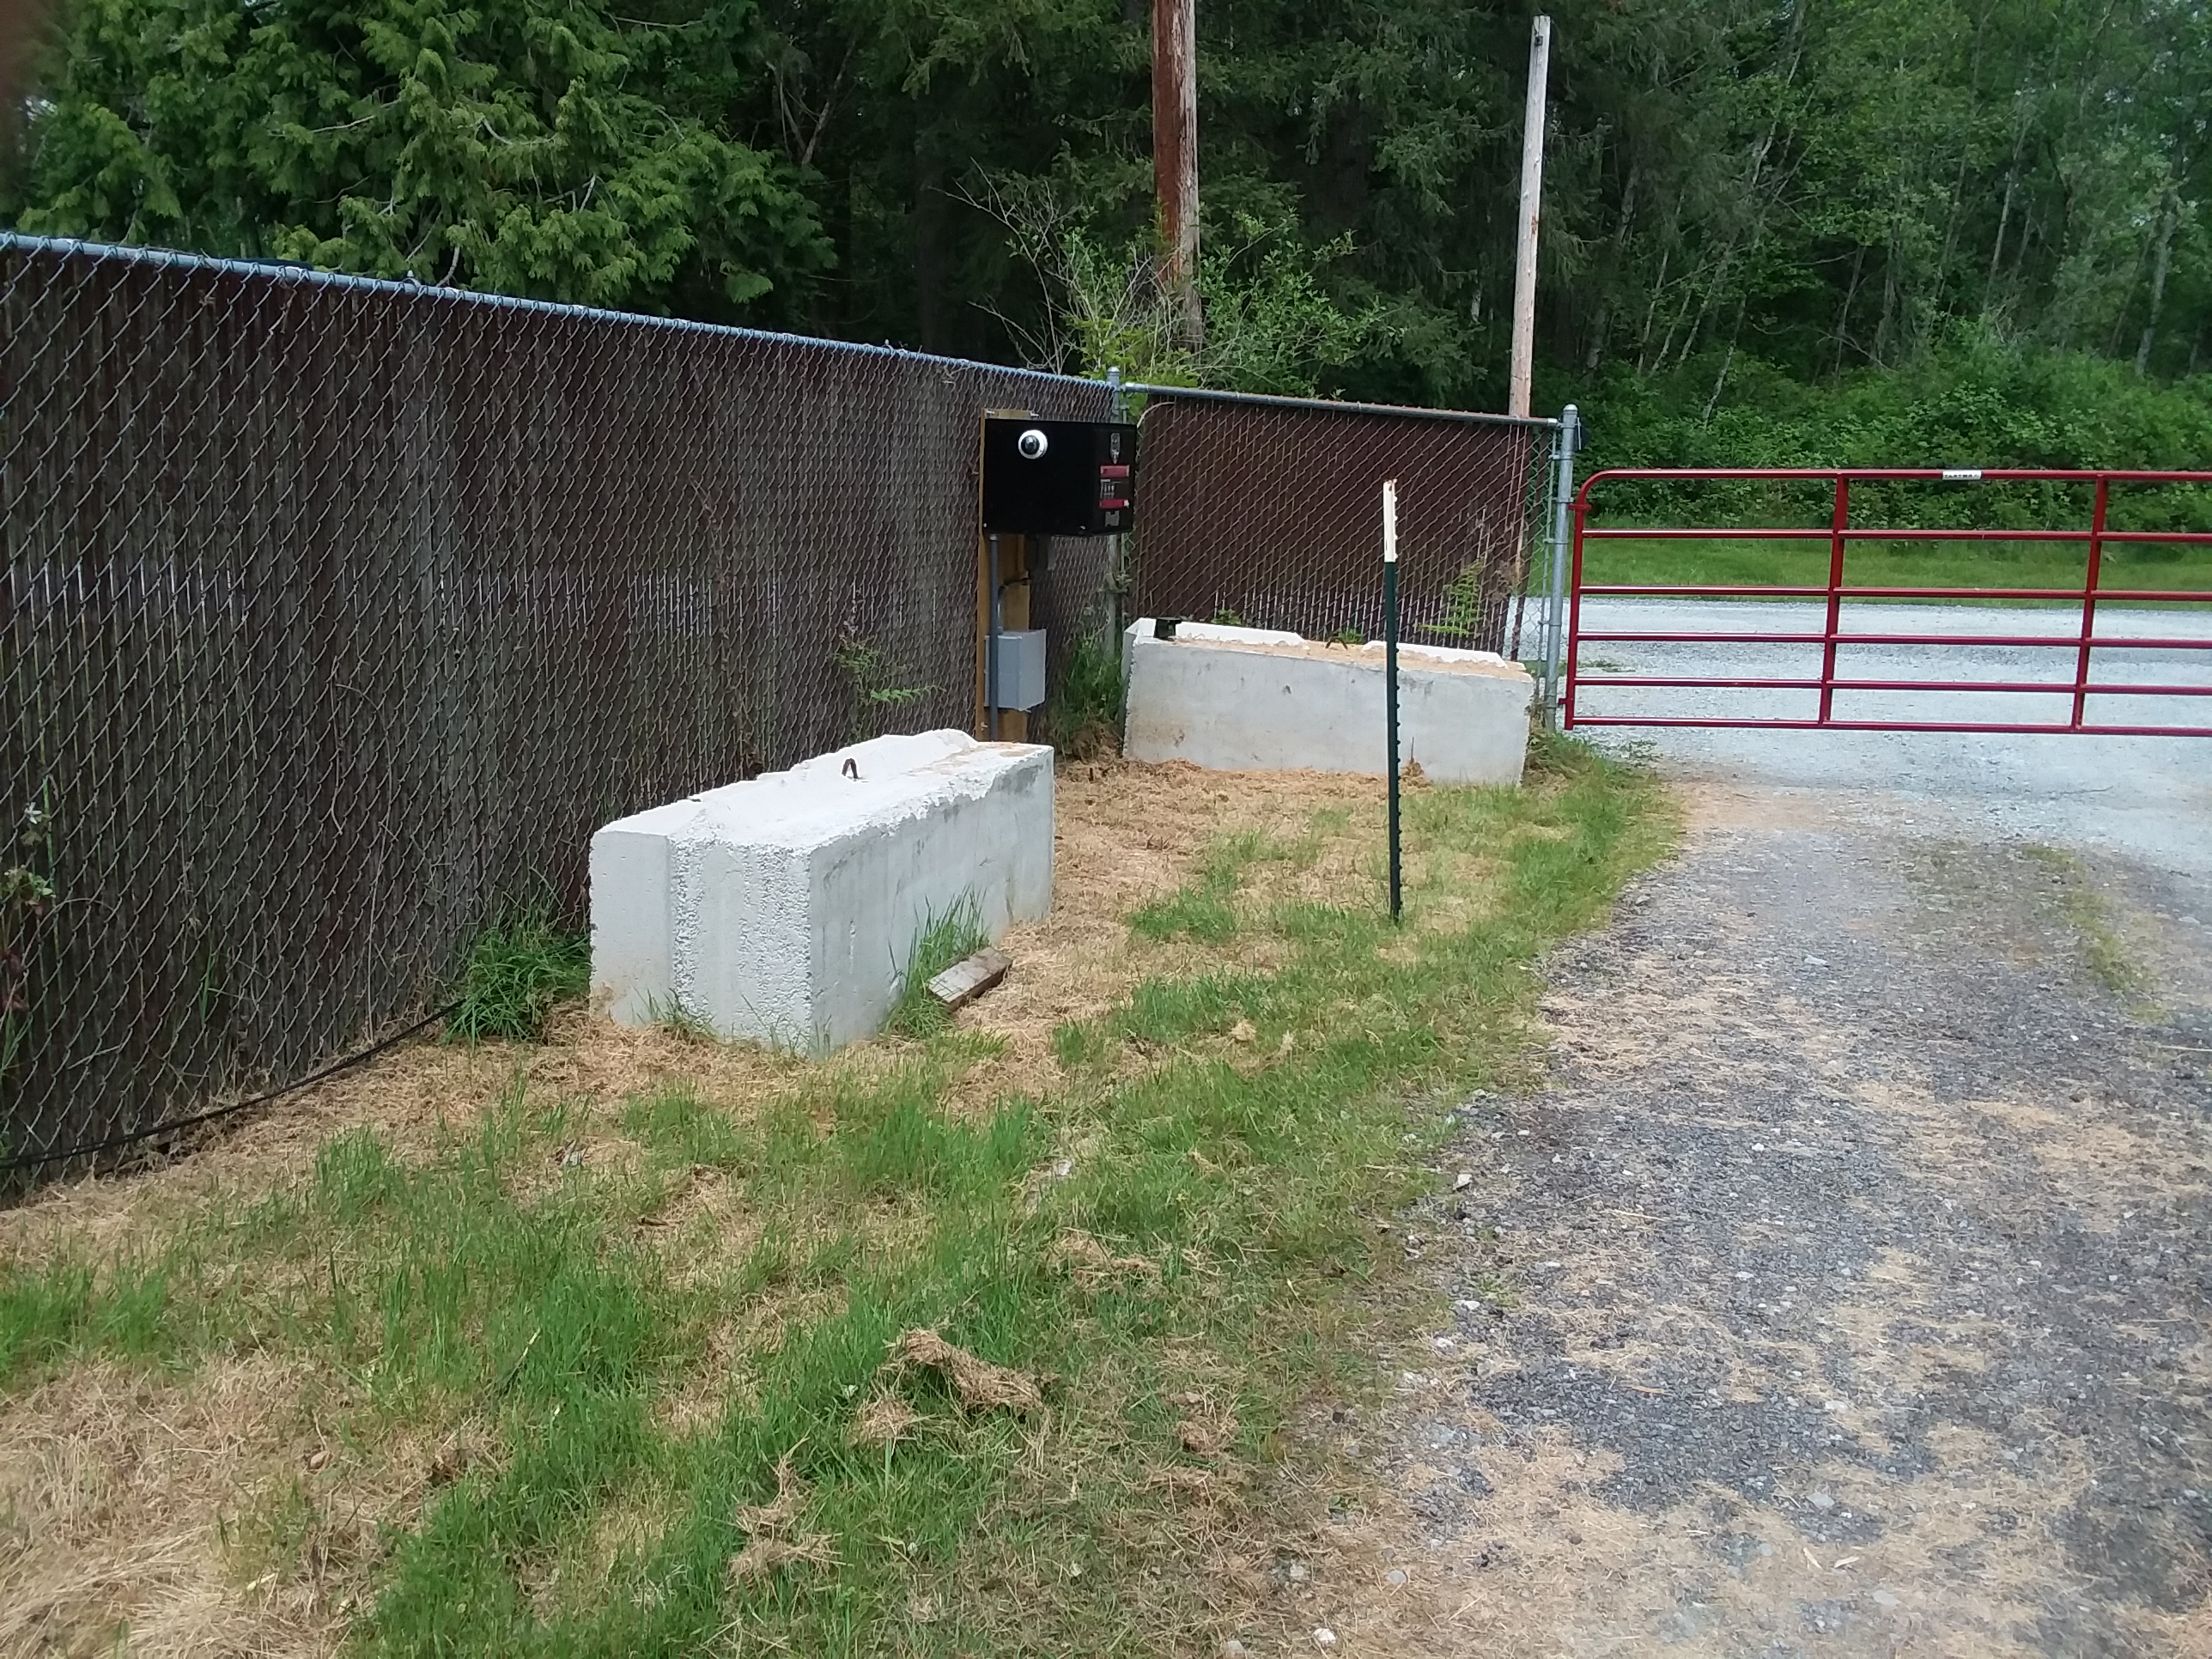
I have started Node 5 (out of order) of my project. It is my node at the entrance to my project. It has cameras on it and will have weather station, gate automation, gate alarm and Wi-Fi access point gear. I am also cutting in power for a service outlet and led lighting. I decided to use an underbody truck tool box for my cabinet so I can secure everything. I am not doing the typical gate control pad with the actuator like most powered gates. I am going to program up an Uno and use a standard cattle gate. I want to use a linear actuator that isn’t coupled to the gate. There will be a latch that has a solenoid on it so an electrical signal will release it and the gate will be spring loaded so once unlocked, the gate just swings open and stays there. The actuator will be set up so that it will push some hardware against the gate and close it then retract back to a home position so that the gate can open when commanded. I want to have it on a timer so that at a set point it will unlatch the gate and then later in the evening at a set point, the gate will be closed automatically. We live in a rural area and none of the delivery people will open a closed gate to deliver. So you order from Amazon and it gets tossed under the fence, rain or shine, instead of coming to the house. Auto gate makes them come to the house because the gate will be opened daily unless I tell it otherwise. I will post more pictures as I build it out.