@JacobJohnson That is an excellent idea, just checked in CAD the actual distance where I would want the cable to run is still under 100m, I have a POE switch and also a couple of POE injectors so that is definitely and option. Also just thought, if I use an ESP32 or ESP8266 I could set the AP to detect when we get close to the gate for added automation on the opening of the gate etc. currently I have it setup on the home network to set a red alert when the wife arrives home lol
You are headed down the rabbit hole that I ended up in. Welcome to that BTW! I ran a power cord to the gate, which in my case was very expensive and I did the work myself. BUT… if you direct bury 2… or dare I say it…3… cat5E cables, you could actually utilize that for POE and other items like network attached cameras that can be POE powered. Or even send low voltage to the area through the spare cables to do the battery charging if you run a small battery setup. Would be easy to set up a small waterproof box (or integrate into your package vault) a 12v battery and solar panel for recharge. Then toss in some gear for the automation of the mailbox/package vault and gate. You could also add wifi to that kit and extend your wifi coverage on your property. Toss in an IP camera and you have a very smart gate node. And in a short period of time, you too could spend a lot of money to have it all that smart!!! Really, it isn’t all that bad. But it could go from super low cost kit to a truck box with a whole bunch of crap in it like I ended up with.
1 Like
@Guru_Of_Nothing hahaha its a slippery slope.
It’s kind of always been a dream to do this stuff, I just didn’t have my own property or the time to learn it (time is still an issue lol), but seeing what everyone else is creating just stimulates my overactive brain with more plans and ideas.
Was trying to think the other day of how I could do this and earn a living, Just have to find a middle ground for all my obsessions and skills… or just wait till retirement.
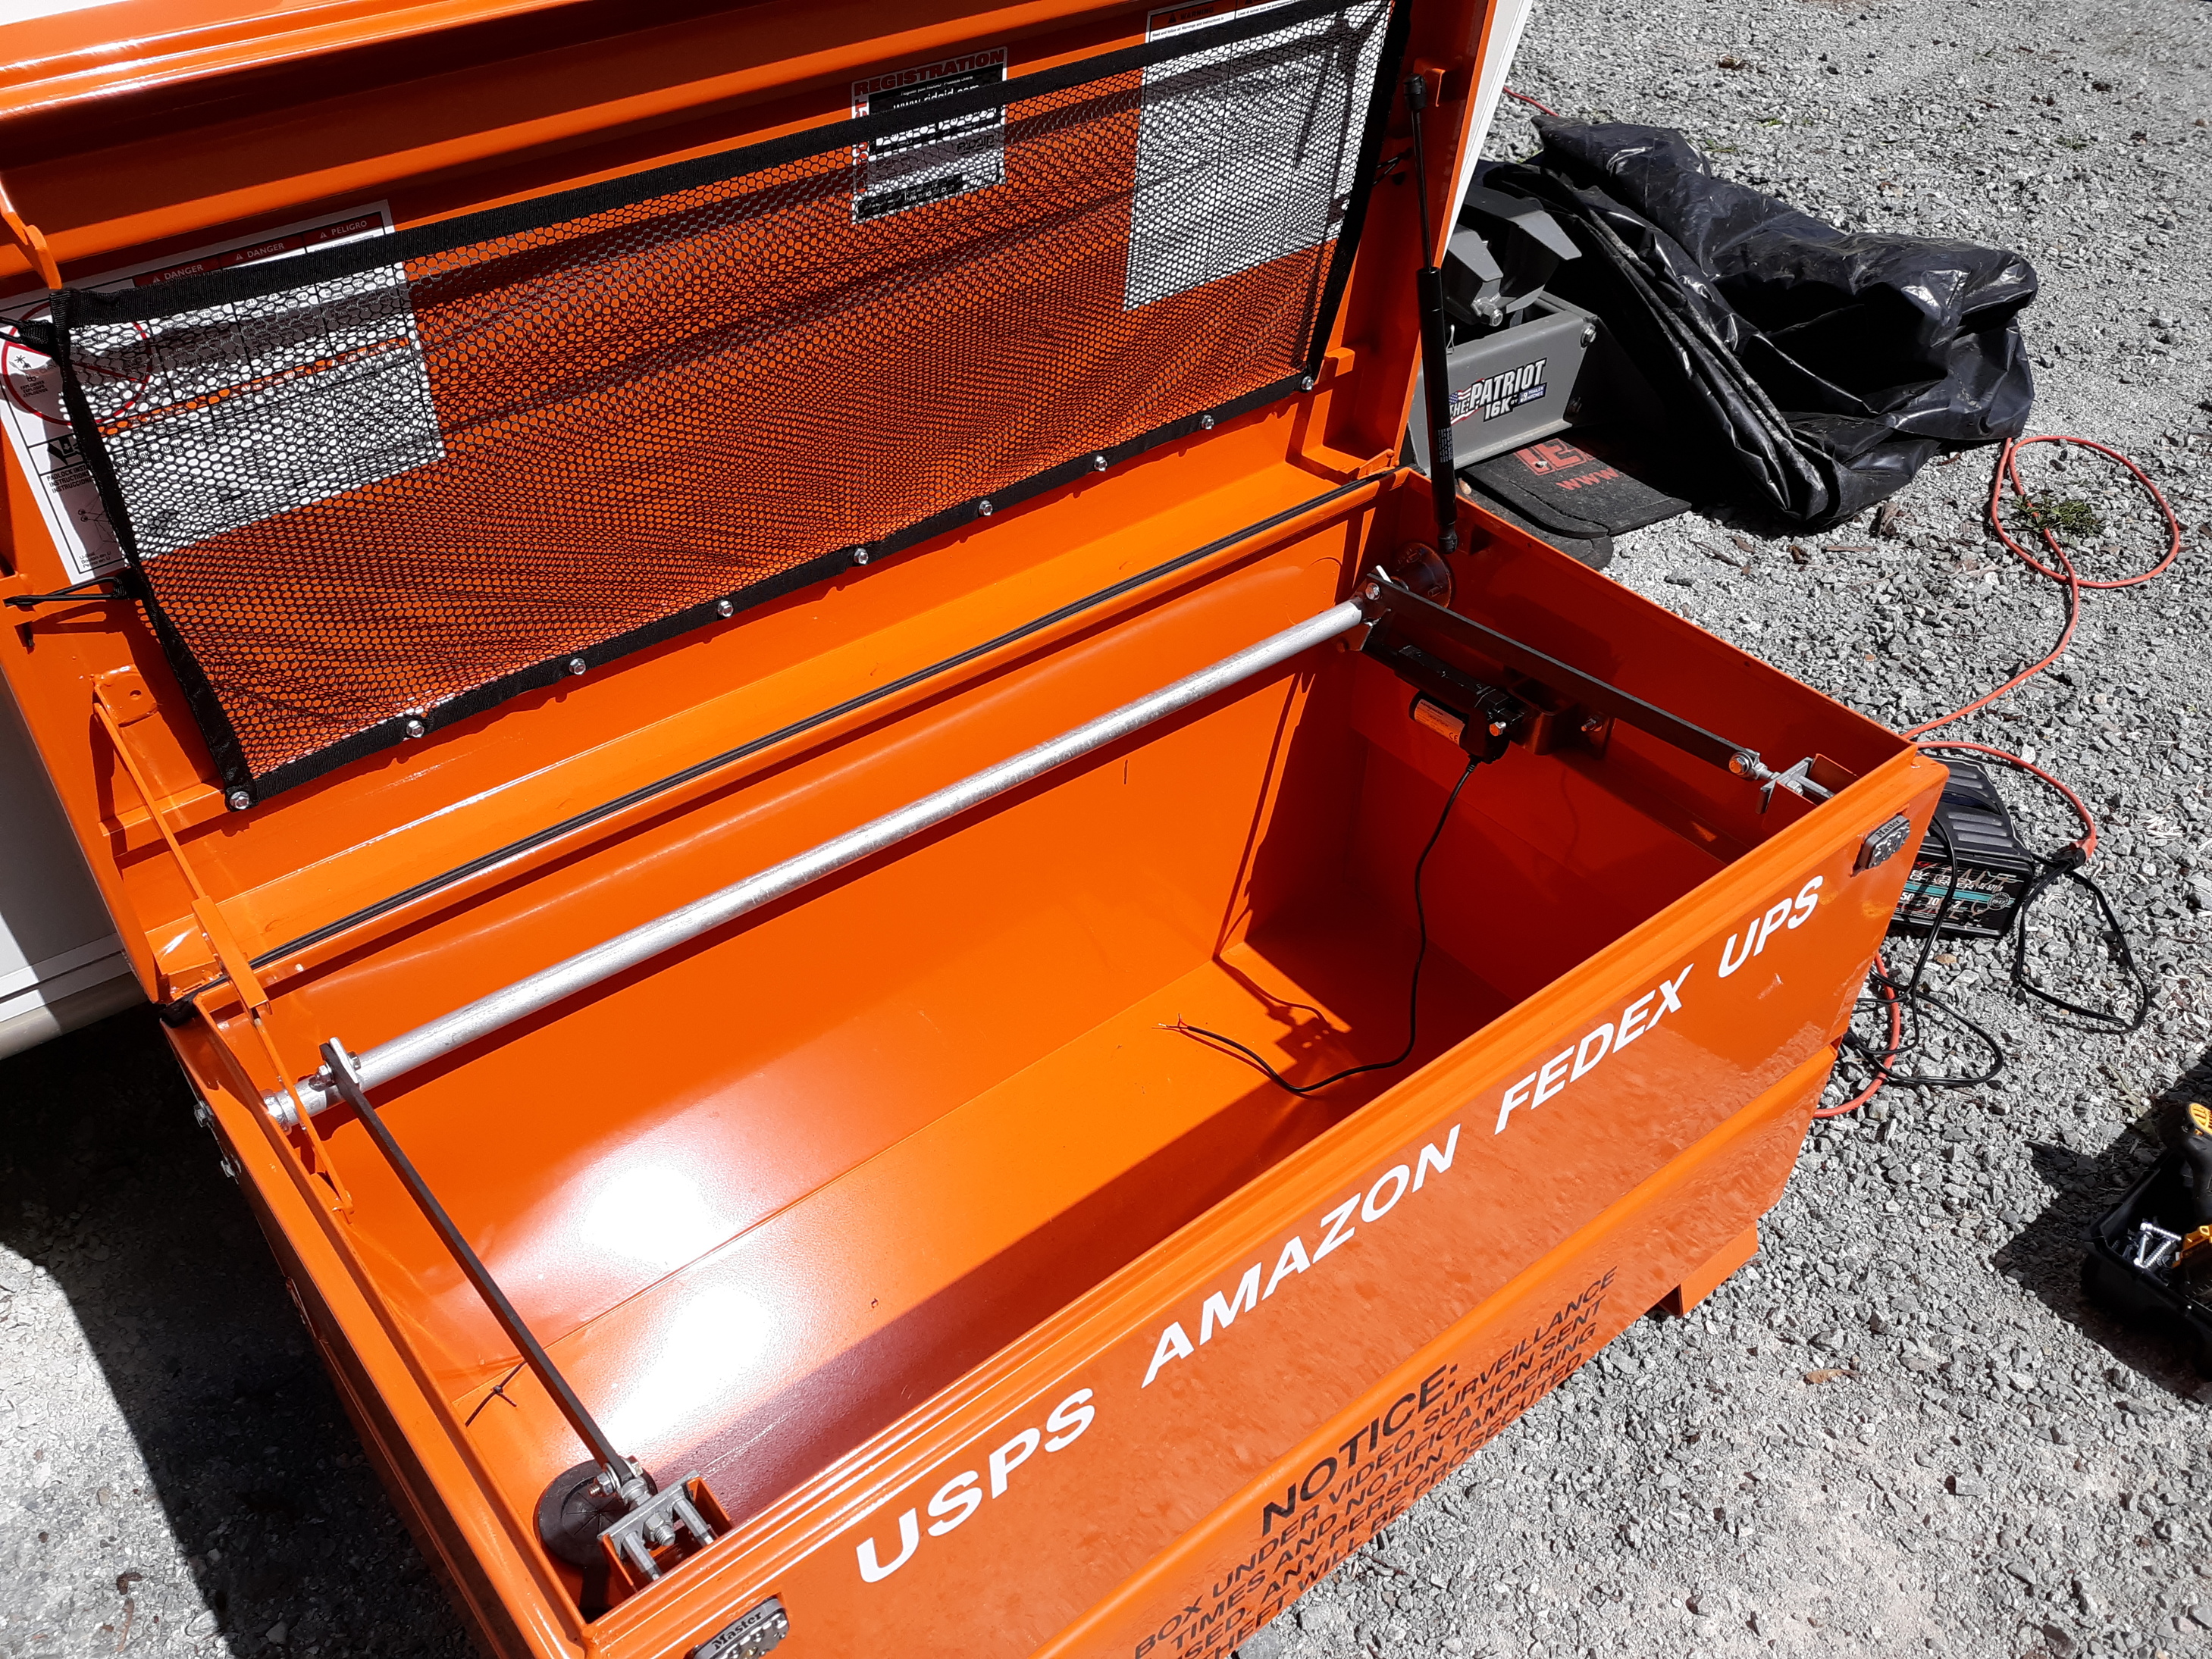
Phase 2! The actuator setup is installed
2 Likes
Brilliant! I was expecting the mechanism to fire quickly with a solenoid, but going slowly like this with a linear actuator is much cooler. No scary “BANG” when it activates, and probably less stress on the mechanism.
I had regular door lock actuators but they did not have enough Force internally to hold the locks in place so you could stick a key in it and pull on the lock would slide out. So I went to a short stroke linear, which there is no way you will ever pull that lock out of position once it’s in place. That linear actuator has 225 foot pounds of torque on it so it is solid.
2 Likes
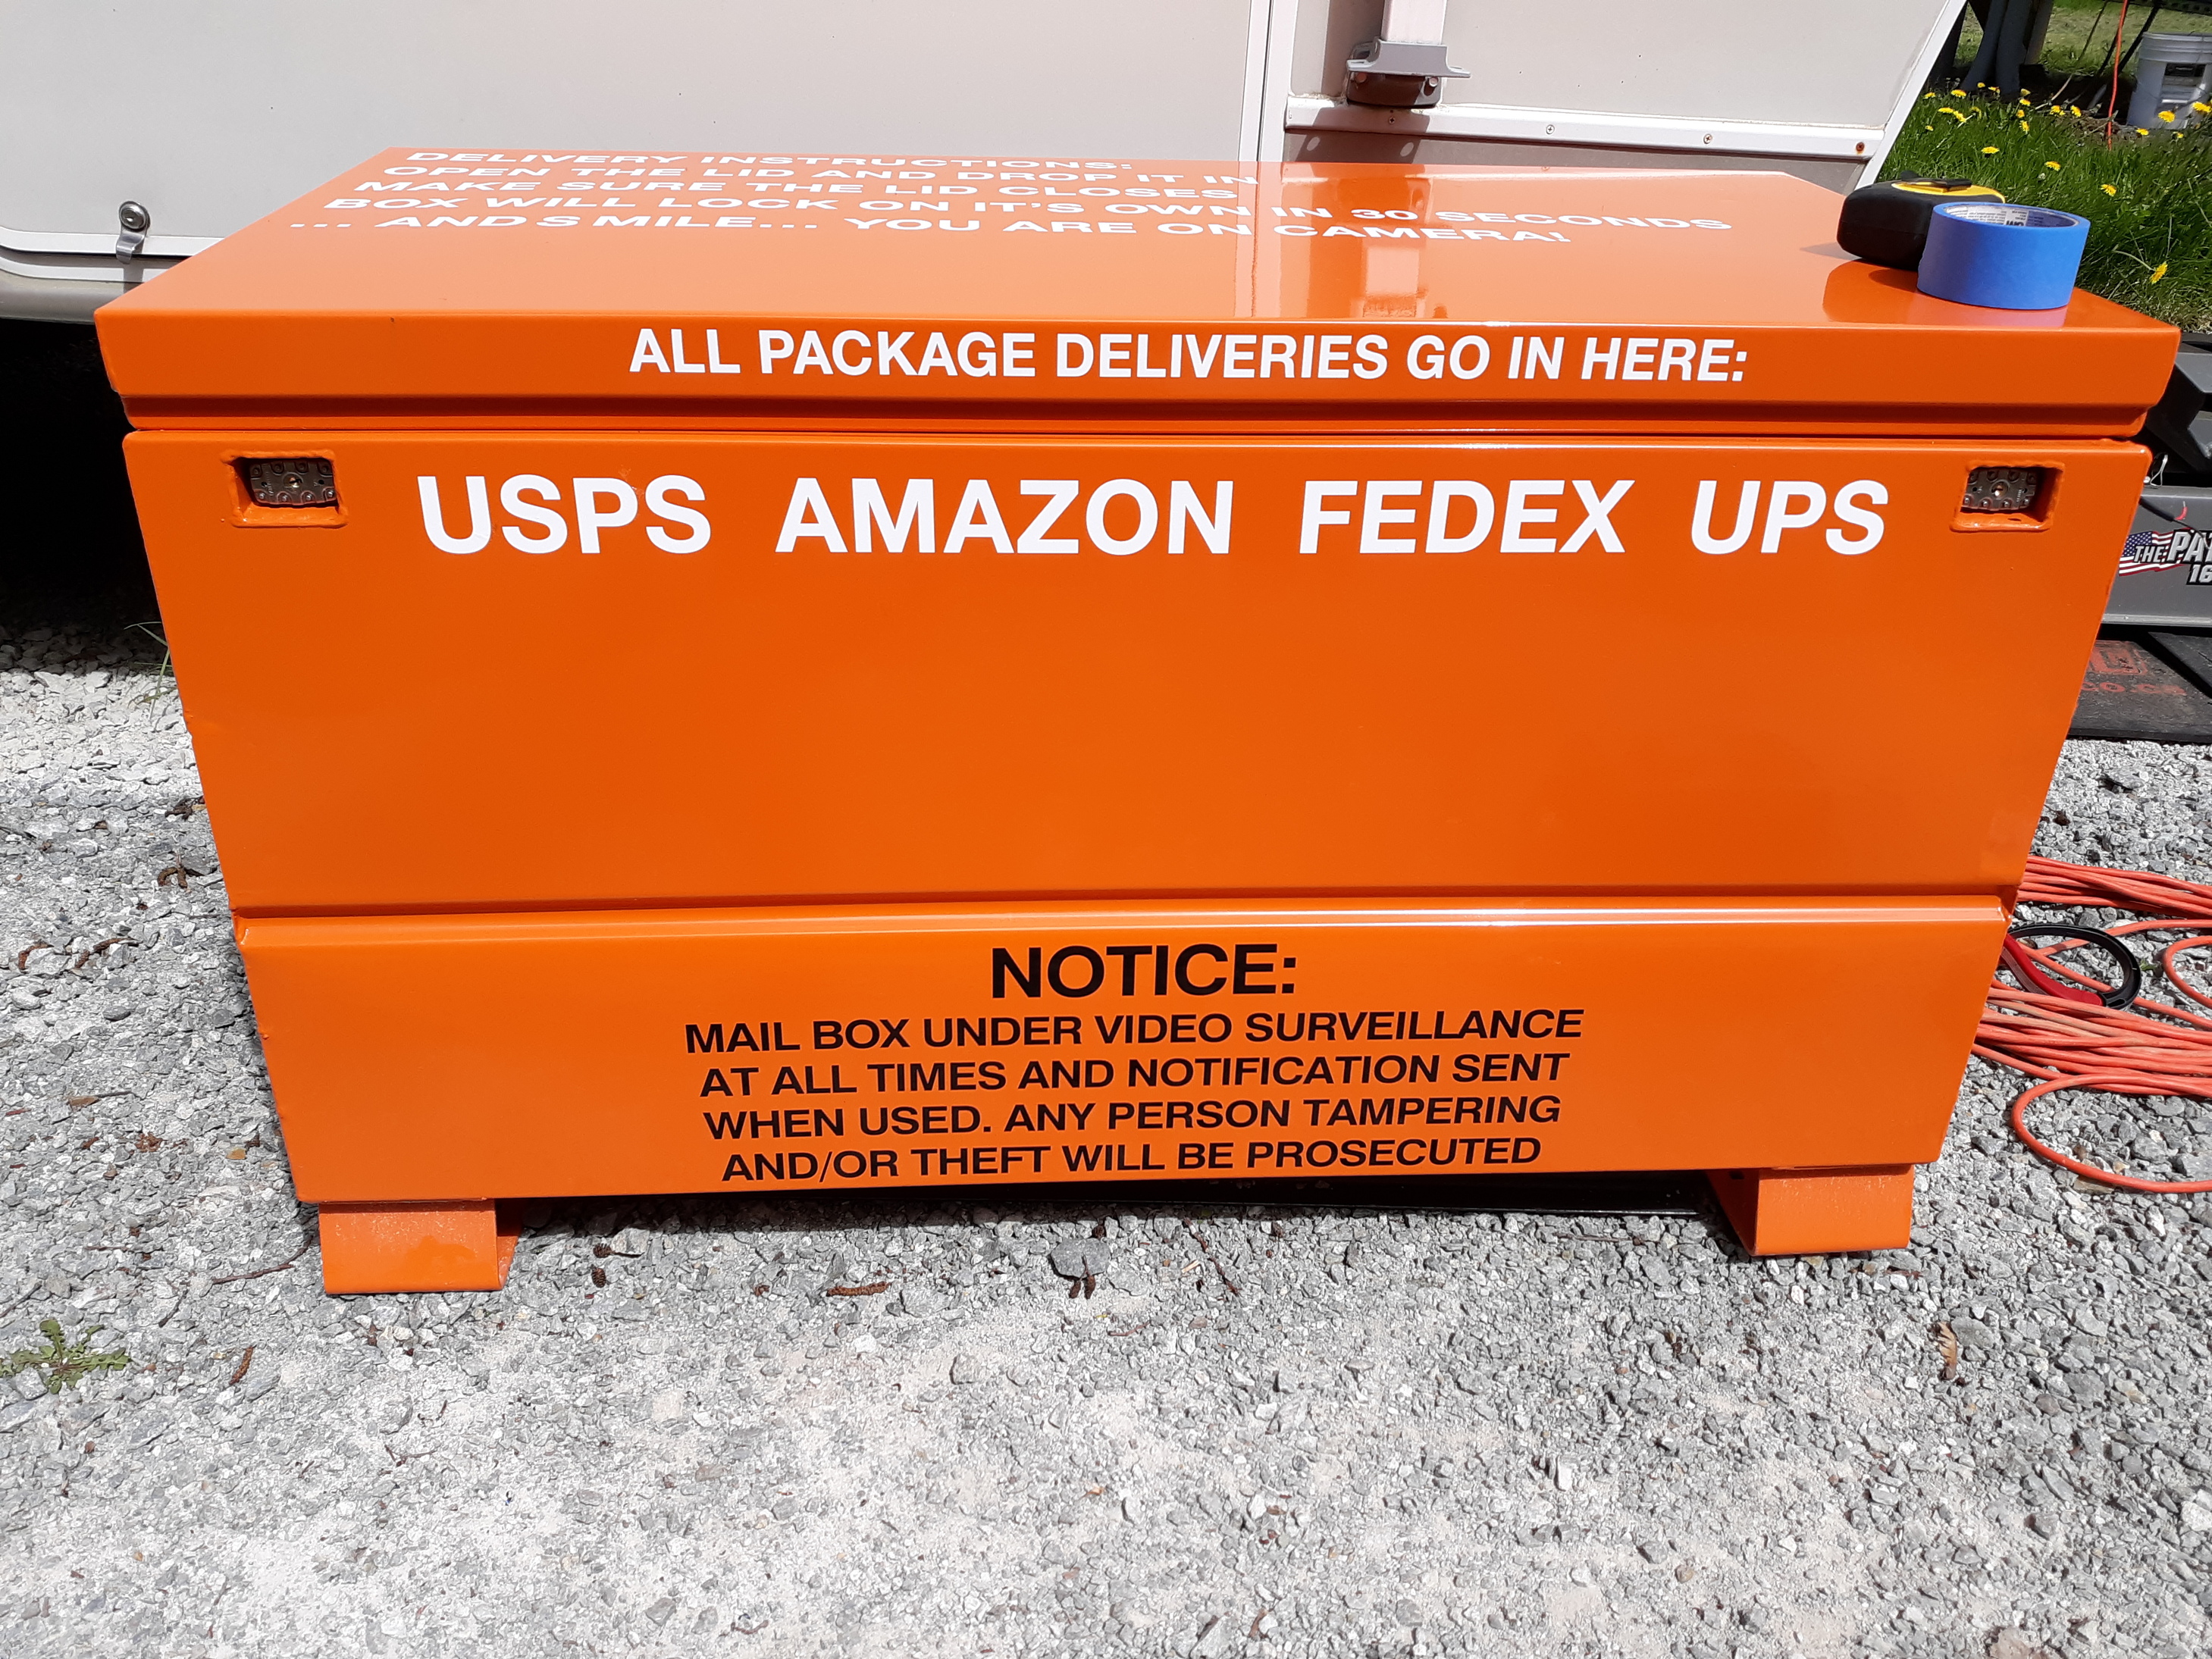
The box itself is done! Now I have to do the controls and integration. I ordered a camera that will be in the box to take video as soon as the lid is cracked to collect faces and then of the package that was delivered. Installing an LED strip around the perimeter of the box on the inside that will turn on when it senses that it closed so the camera can see the package in the dark world of a closed box. All of that is motion triggered.I have a mag switch to install as well. I am finishing the basic schematic of the electronics tonight and will post that once it is done.
The front graphics…
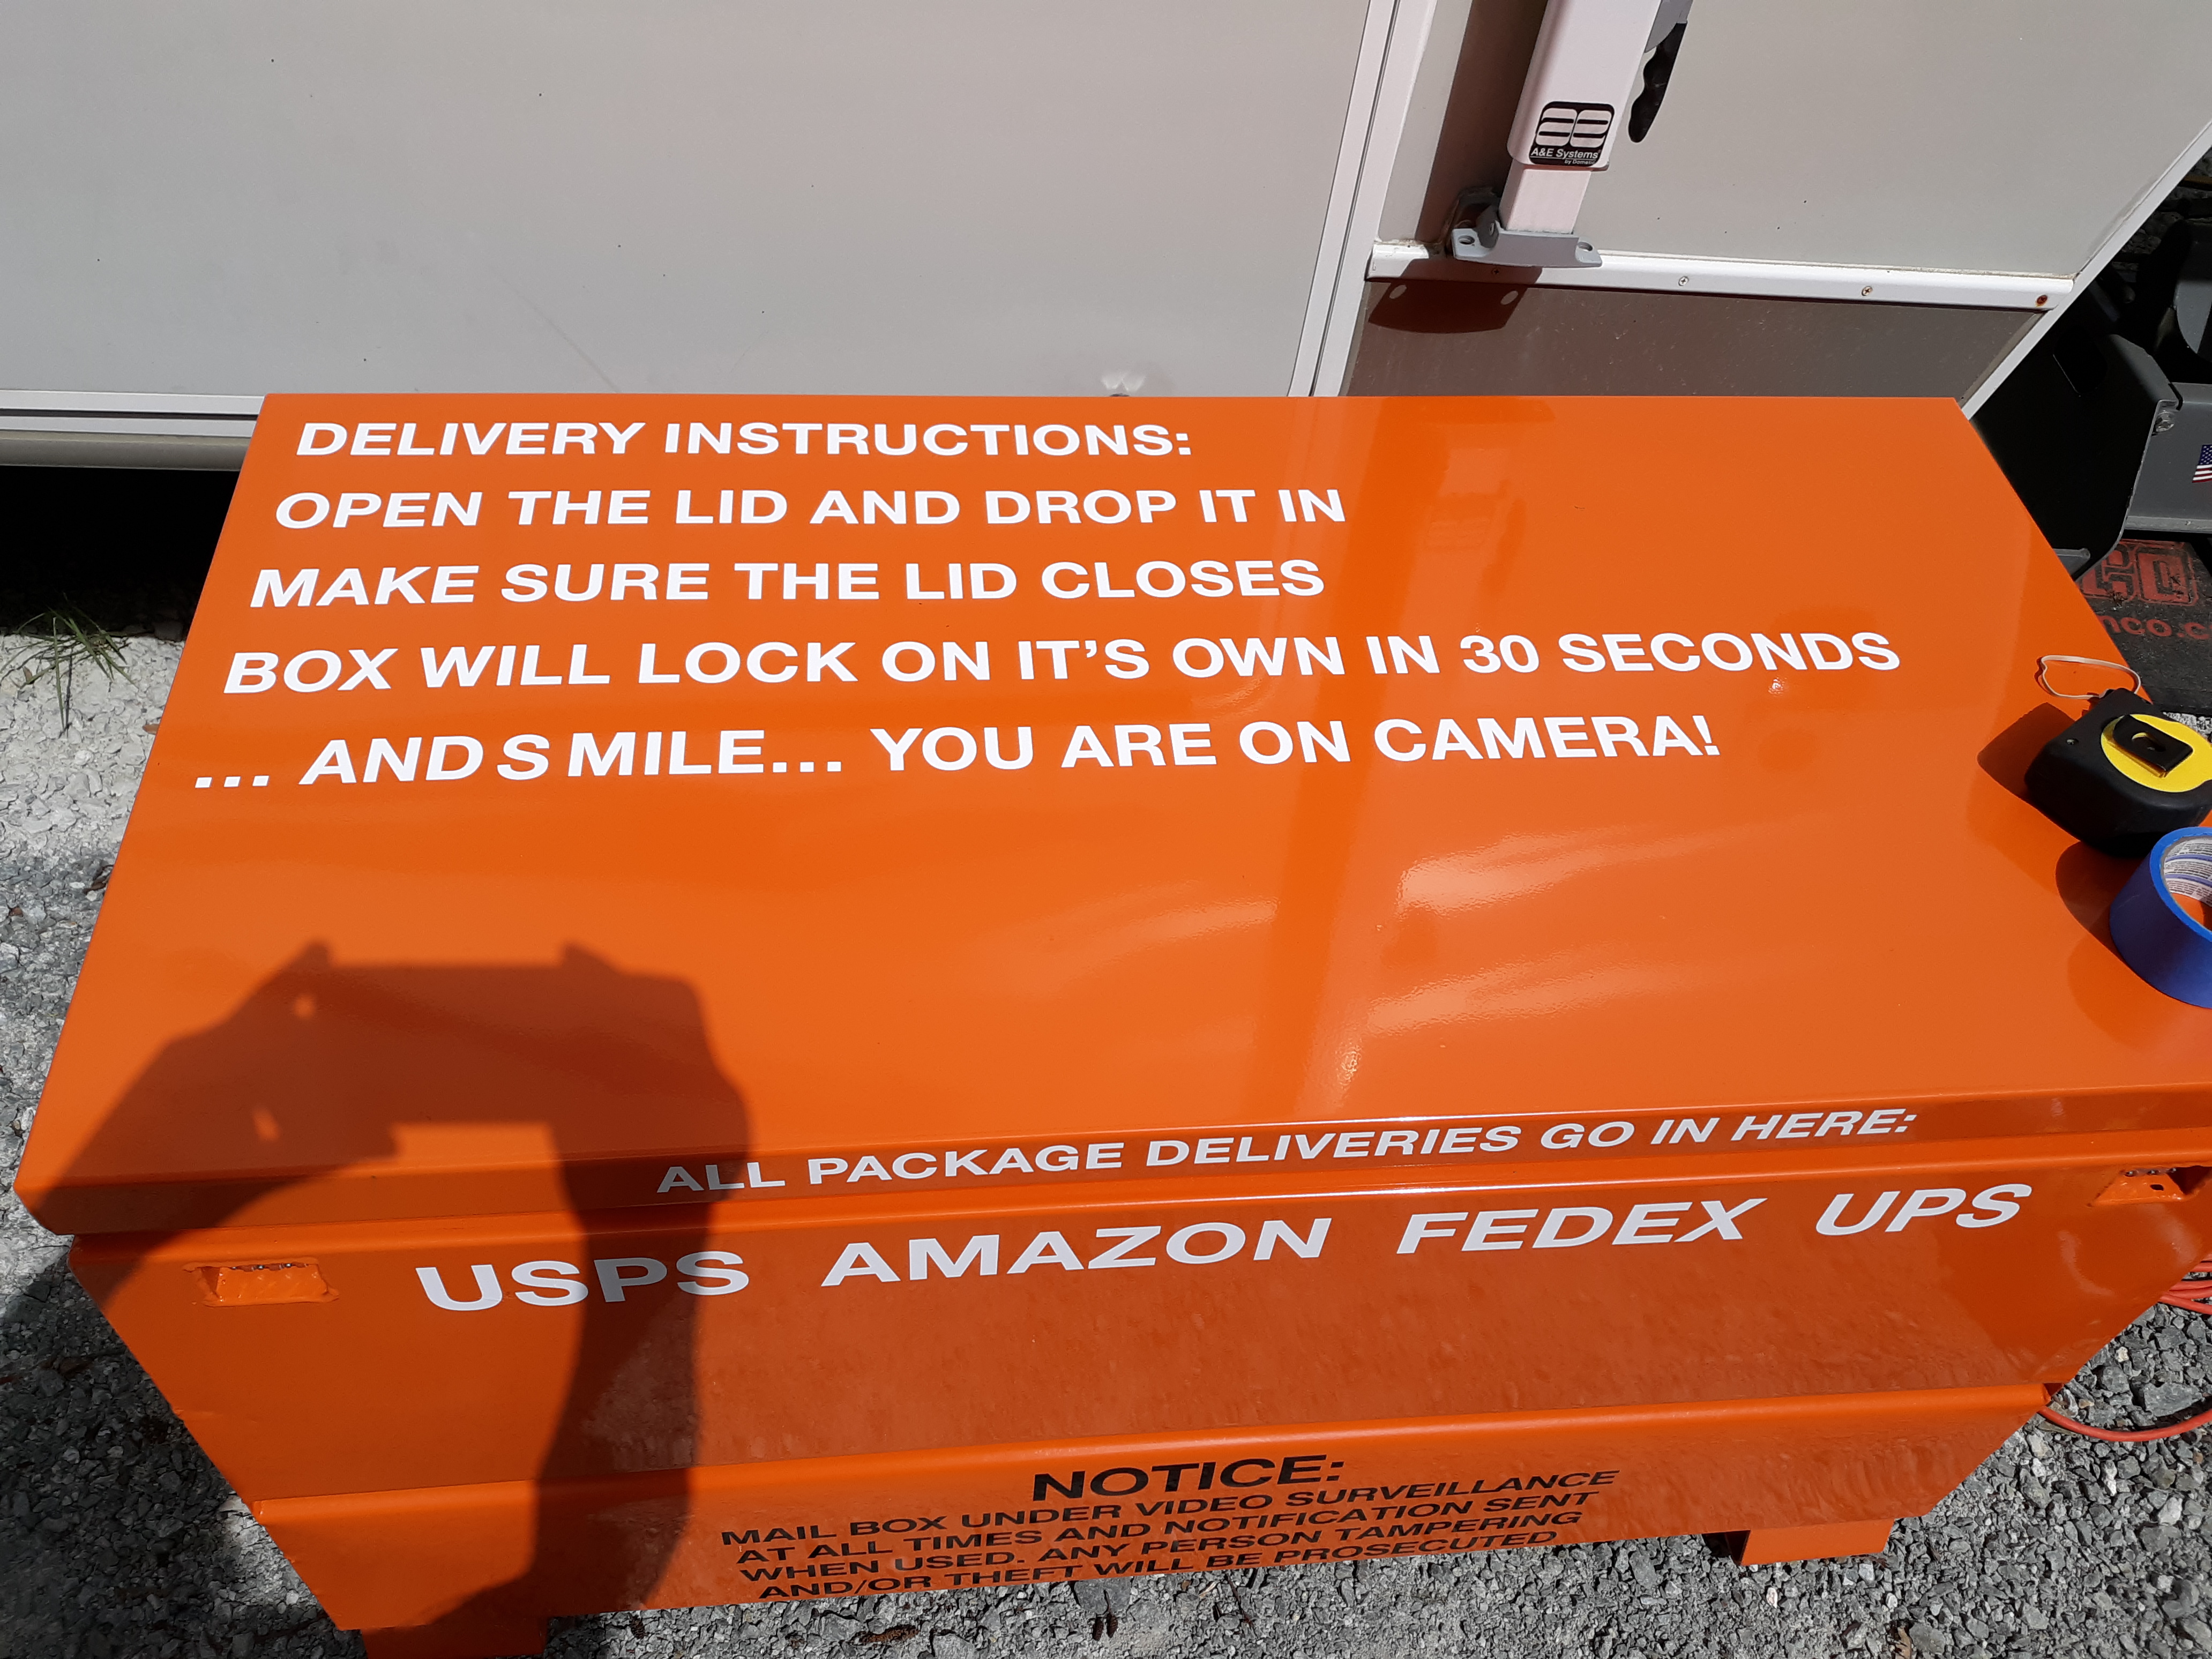
The top graphics…
The finished actuator equipment…
1 Like
Might want to change the wording slightly…
“drop” is probably not the best choice.

2 Likes
Here is the basic electrical diagram as it stands. Obviously, this is the true prototype so things could change as it goes but I think I have the majority of it fleshed out at this point. I have all the stuff in the diagram in my collection already so I am going with what I got and will more than likely tweak the design for the second version ( YES… there will be a second… or more actually as a friend wants one built that is self contained and powered by solar and a couple other people have been fishing to see if I will build them one once I get mine done). I am already pondering putting a switch in the 12v power at the battery instead of pulling a fuse to kill that circuit since it will be at the node cabinet, not at the box itself. A switch at the box is also probably a good idea, just so I could work on it and have a switch close by in case I let the smoke out… shit happens. To me, alot.  The 8 relay setup is just because I already have a handful of them. I could get away with far less but the expansion ability is worth it to me should I come up with other items to add and makes it worth installing it now.
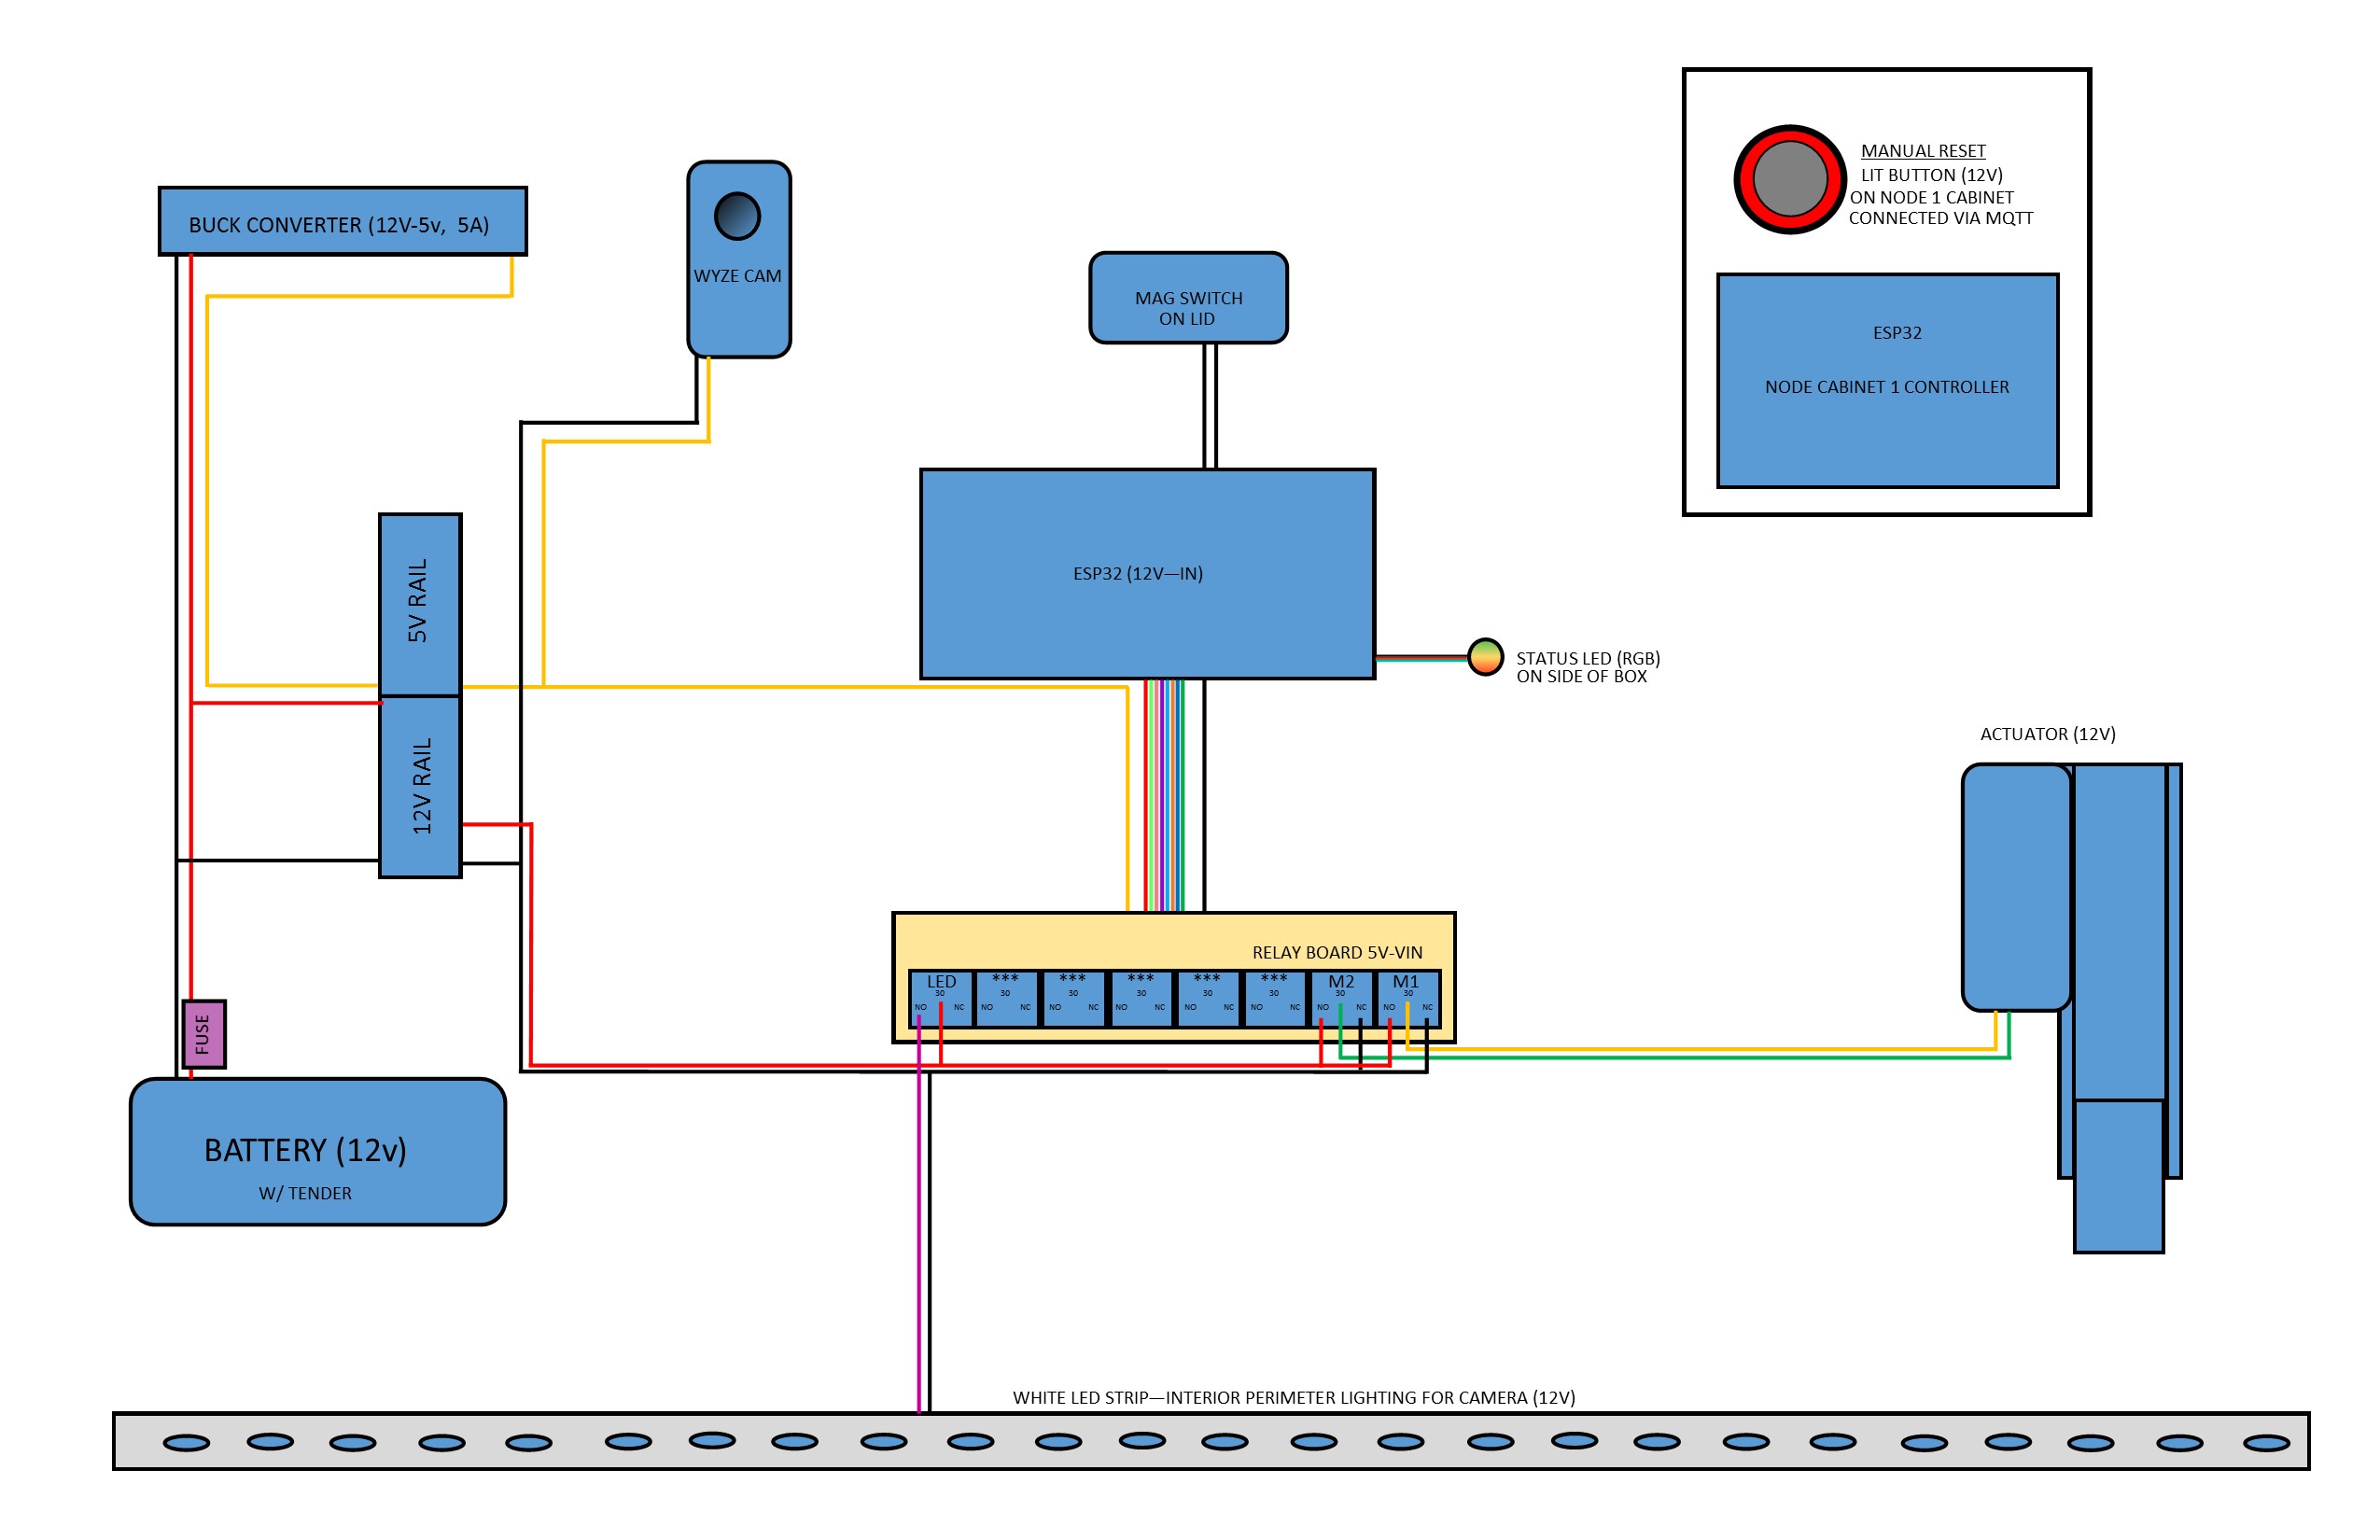
To explain the camera thing a little more… The first thought was that I wanted to capture a picture of the person that opens the lid as they look DIRECTLY IN THE BOX. Keeps ‘hoody wearing asshat looking to steal my packages’ from disguising him/herself from the overhead cameras. Then I wanted an actual confirmation that a package was in there after the supposed deposit (was it a lookey-loo or an actual delivery?) . I have been looking around at different camera options to do that and the market for exactly what I am looking to do isn’t there at the moment… or at least without spending a crap ton of money anyway… so I chose a cheapo WYSE cam that does motion capture and can be plugged in externally to power. It isn’t POE or IP anything, just a microSD card for recording. Good enough for a prototype model. Because the lid will be closed when it is activated, it will be dark inside. That is unless someone clmbs in with a flashlight of course
 Sorry, back to the topic. There will be a ring of LED’s around the interior perimeter of the box that will be triggered ON after the lid has closed so that camera can see what was or wasn’t deposited. Overkill? For sure. The plan was to have a few pics snapped throughout the delivery and then I could see from my phone those pics remotely. For now, this will just give me one more layer of record. I can go pull the card if there is an issue… that is unless they steal the camera but it is a whole $30US and it will be epoxied in to the lid, so it won’t be worth a crap if the take the effort to pry it out of there. I bought an ESP32 camera and within 3 minutes of taking it out of the packaging, I rammed a sharp object through the seam in the case and poked a couple SUPER tiny resisters off the board. Oh well. Ya win some and lose a bunch more.
1 Like
I am SO very happy right now!!! I went from Arduino “knows-nothing” to Arduino “knows-barely-something” and successfully built a prototype controller for my package vault!!! I am sure the code is a little bit top heavy and and could afford some refining but it works smooth and proper. I have started working on the weatherproof enclosure for the hardware and will get that wired up for install once I get to bed and wake back up…well, today, since it is 0530 and I should have been in bed 5 hours ago (but that adrenaline rush of accomplishment prevented that).
In case anybody wants to look at the boring stuff, go ahead and grab V2.0 of my code HERE: I never had a GitHub page until today. That is exciting as well!
MUCH MUCH more to come on this project in the next couple weeks!
3 Likes
Holy Crap!!!
Somebody posted clearly readable code to github.
WTF?

Awesome!! I’ll check it out…
@Guru_Of_Nothing FYI, I hope u changed ur wifi ssid/password in your .ino’s on github because they are stored in clear in text on there for the world to see… if u accidentally leaked ur real info on there it’s time to start changing ur local security settings… (I did this a long time ago and now just get into the habit of triple checking for my personal data and filling in random (valid for the purpose of explanation) garbage… ip/mac/ssids/usernames/passwords/tokens… these are what u should always change b4 uploading for your own digital security hygine…
Nice code!! I’m much less organized when coding…
@JacobJohnson THANK YOU for that heads up! I did upload the files with the real info in there. I just pulled them all down and installed a sterilized one of the latest build. I am usually good about making sure that personal info is protected. Just didn’t think about that in the code  It’s ok. Got it fixed. It was only out in the wild for a few hours and only a couple have seen it so I am not too worried about it. None of the stuff that applies to this is accessible from the outside at this point. And my entire network is behind a PfSense box that I keep breaking the internet with. If I can’t get out, not sure anyone is getting in either
And thank you @Tinker as well for the compliment on my first real code project. It great to know I didn’t do too shabby in that regard. I am working on it right now to do just a little bit more cleaning and commenting. My hope is that it will be helpful for someone down the road.
UPDATES!!! I went through my code with a fine toothed comb and did a bunch of cleanup on it. It is well commented and seems to be pretty sound. I have all sorts of things I want to do with it like create a piece that actually resets the arming timer to start over again of the lid is opened before the timer expires. Since my ‘timer’ is a delay() function, it wouldn’t know what the lid switch was doing anyway… 'cuz it’s staring off into the abyss doing some math while the lid is flapping in the breeze. I need to find a millis library that is ESP32 compatible so I don’t have to code out everything.
I shot a quick video of the hardware as its set up on the lab bench here and how that works. It is posted on my channel HERE: Check that one out if you need to waste some time. I also updated my GIT with the newly scrubbed and polished code. On to shoot some more video.
1 Like
I integrated the parts into their waterproof enclosure. It’s a pretty big box for so little but I had it and I needed the space for waterproof passthrough fittings. Definitely not the ideal box but good for this version. I also installed the light strip and the mag switch in the box. Will get pics of that posted later today hopefully. The ESP32 can be powered through USB obviously and the buck converter I am using has both USB and screw terminal outputs so I ran a short USB cable to power the ESP and ran the 5v to the power rail from the screw terminals. I glued in risers for the board… just because it made install easy and I glued in a riser to use as a stake to zip the USB cable to so it would not move if there was vibration.
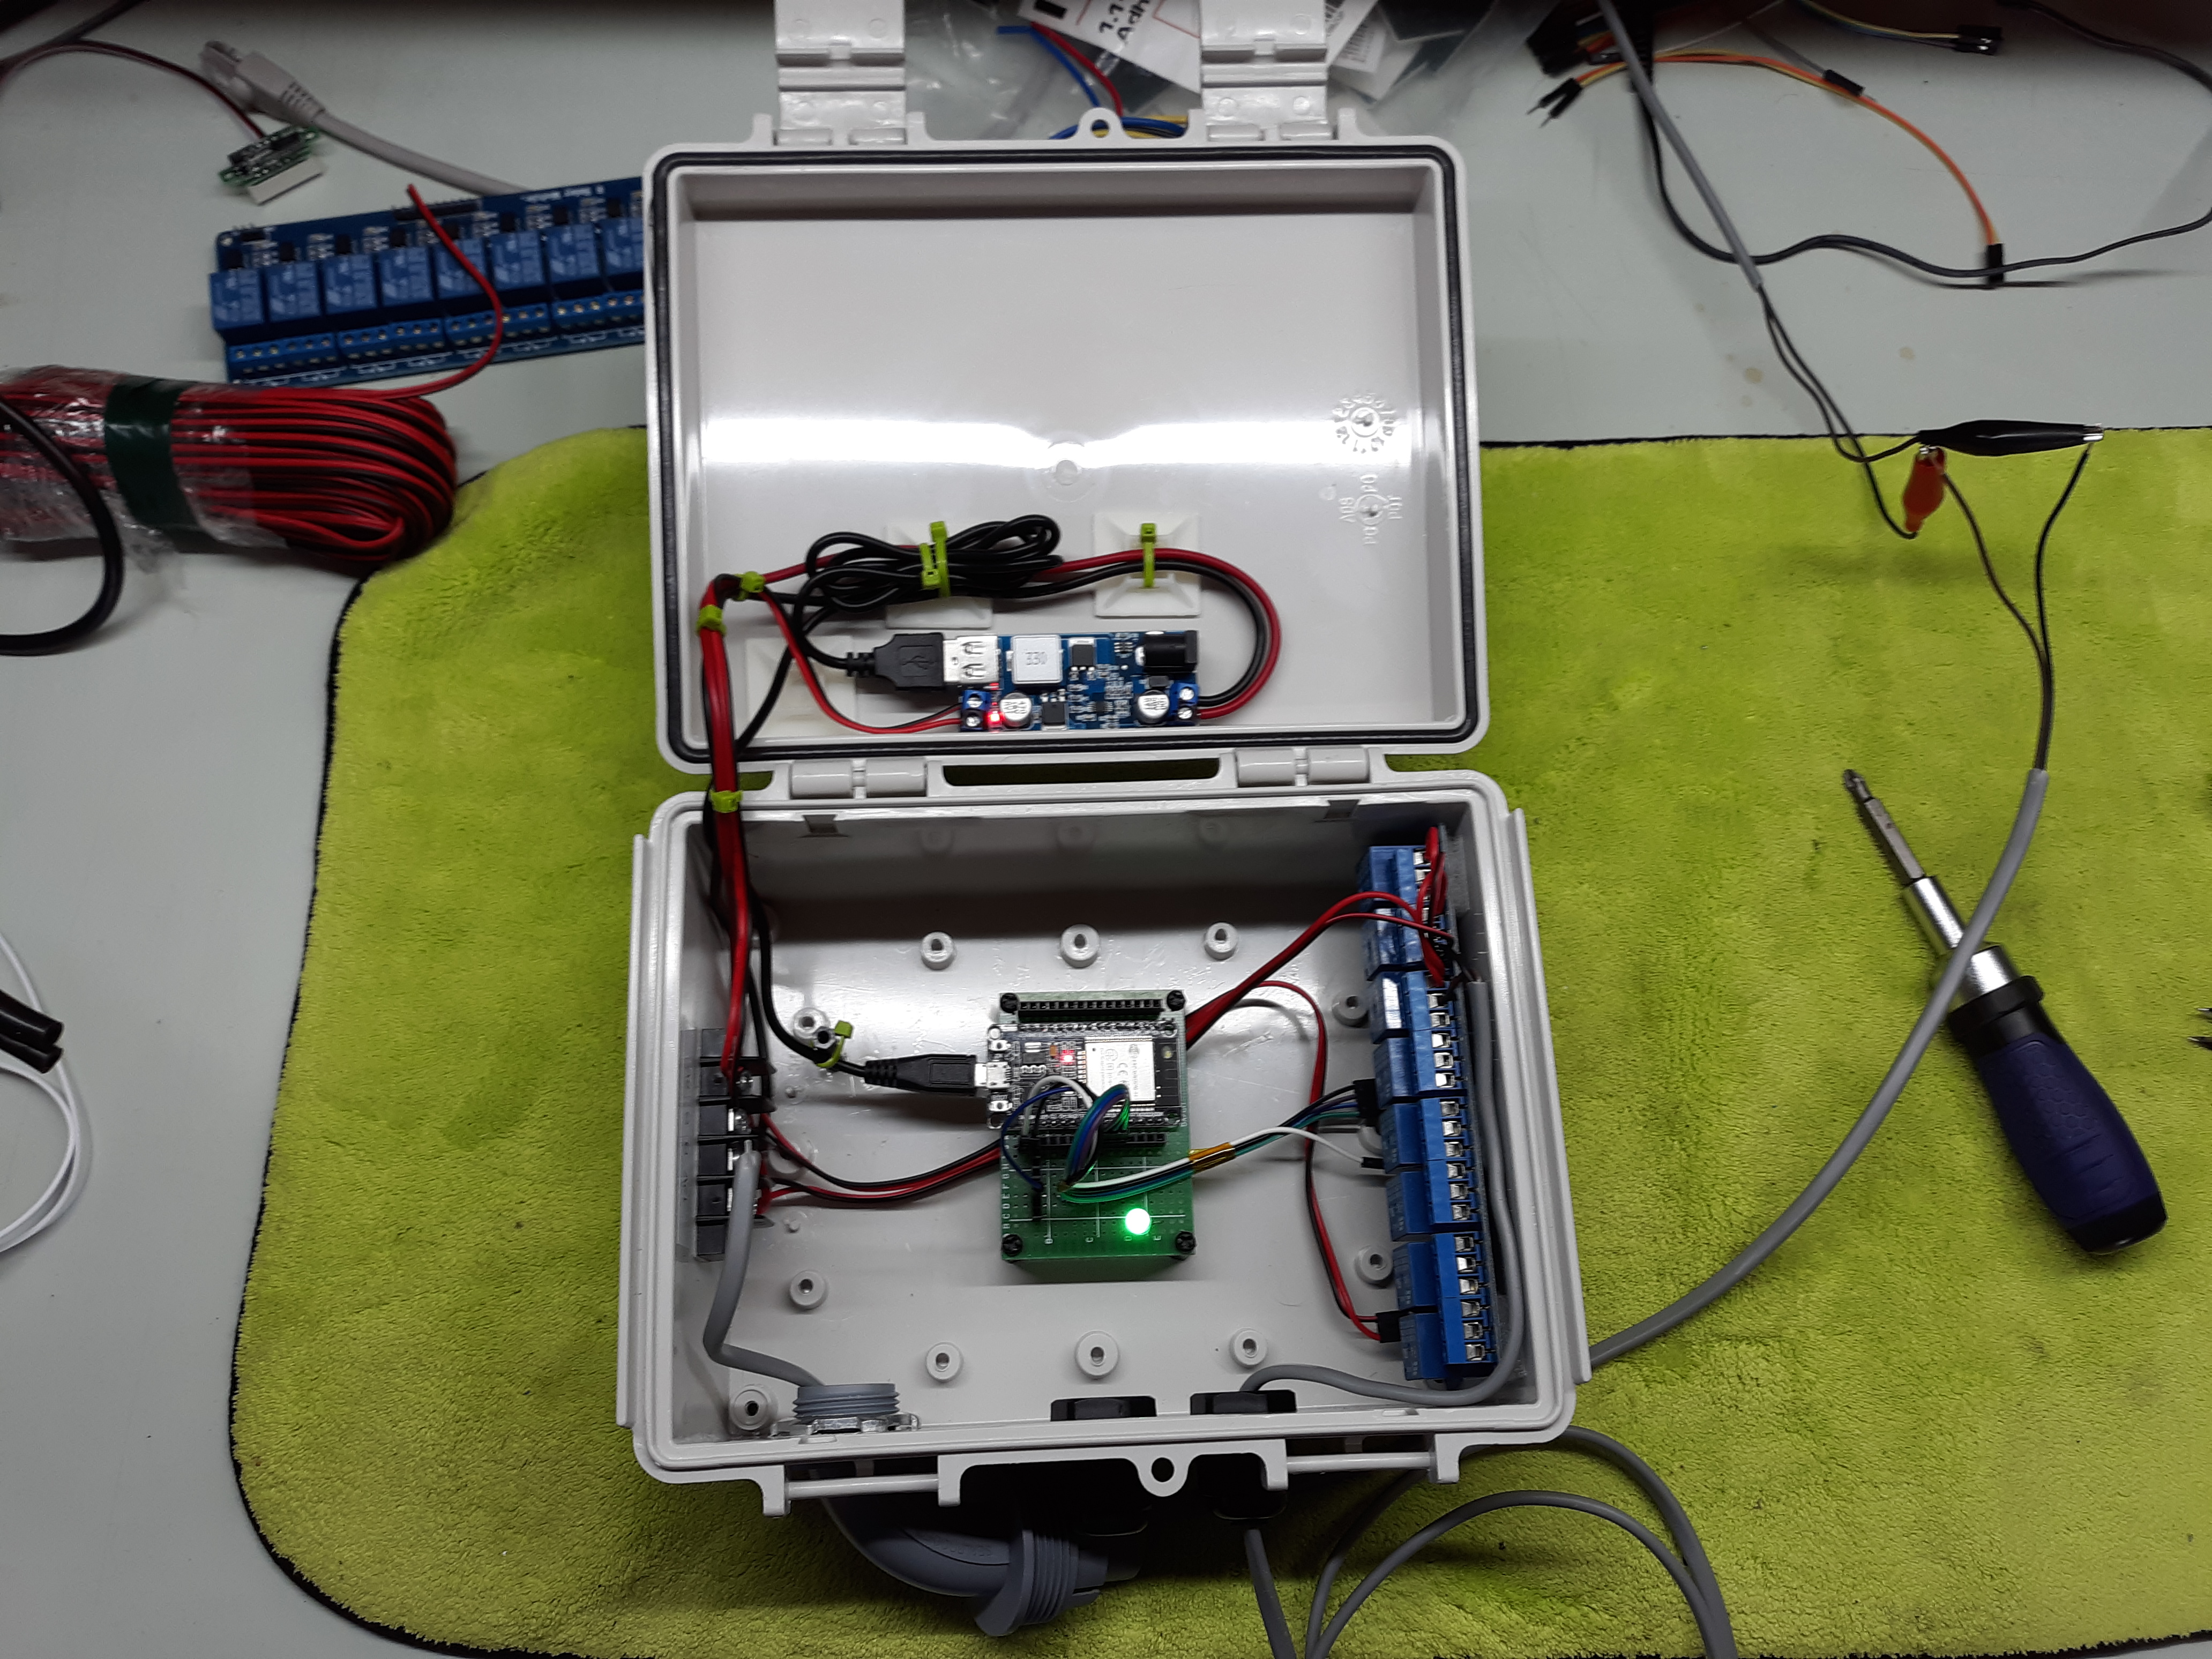
3 Likes
The Completed Prototype is done!!! <------Click it… you know you want to 
EDIT: I had the video playing in the background and noticed that somehow there were a couple edit points that went wrong. I will be fixing it and uploading again later but it is fine for now… just not the finished product I wanted online.
I got the box assembled and installed on the pad. All wired up and ready to receive packages! I made what will be one of a few remote reset buttons and will get it installed on the Node 1 cabinet today so there is an actual physical reset button in the general area of the vault. It works on the bench so should be plug and play. What a fun project! The postal delivery gal came by while I was installing it and talked about the project for quite awhile. The neighbors all asked about it.  Can’t miss a bright orange box!!!
1 Like
Looks great !!!..Would love to make a small version of this …A couple of weeks ago i was expecting a parcel from the states …got a message from DHL to say it had been delivered and signed for…two days later i check my meter box and there the parcel was…If i had something like your box would save a lot of hassle…keep those videos coming…Frank
Thank You @FrankMc I am having a lot of fun with this project. Rigid makes a smaller box… 32"x19"… as compared to a 2’x4’ which this one is, and once I get the hardware all dialed in I am going to build a couple of the smaller ones for some friends that have porch pirate issues. Put the battery inside the box with the charger and run a cord out the back to the outlet that is on the wall adjacent to the front door. Even if a thief thinks they are going to unplug the vault and come back later after any packages have been delivered, they will have a long wait. Like a week or two.  The battery will keep the thing happy for a very long time.
So… In a post above this one, I said that my button worked on the bench so it should be plug and play? HA. Not a chance! The serial monitor showed the button worked and MQTT kicked out the message that the reset call worked. However, when you power up that little unit, and have forgotten to change the name in the code for MQTT, you get two items fighting with each other and stuff just flat stops working! I was an hour and a half trying to figure out what I had messed up. Got it working though so it does it’s thing and the button calls for a reset. Whewww! Working on the control hardware for the gate closer tonight.
1 Like