I wanted to do a quick write up on the overall architecture of Jon’s light switches. The question comes up often enough that I thought I would consolidate the options and layout into one place. There are a few videos on this spanning many years, and the project has evolved over time. I’ll let @jon yell at me in the comments for things I’m missing or get wrong. This will focus mostly on the hardware. Software is a much larger topic, but this will get things set up.
See also:
Superhouse #24: Home Automation System Architecture
SuperHouse #25: Arduino home automation light switch controller
SuperHouse #26: Make your own home automation light switches!
Forum post showing some (future state) RGB LED switches w/ ESP8266
High-level:
The system consists of two independent systems - Inputs and Outputs.
The inputs are the switches on the walls. The outputs are mains-rated relays located in an enclosure with home-run mains wiring for every ceiling light (and some others). Other outputs are mains plugs along the wall. The inputs and outputs are only tied together via programming and logic (think: Node-Red, OpenHAB, Home Assistant, MQTT messaging…). The buttons just post a message to the logic system; which then has options to turn on or off different outputs. Each side could be installed without the other, if desired.
Planning
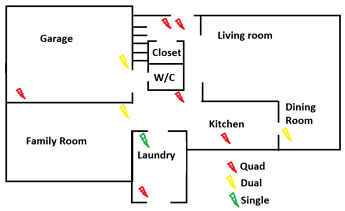
Start with a plan; including reverting to standard when selling your home. Start the documentation as you go through this planning. Map your house and count how many of each kind switch you want in each room. Options are single, dual, and 4-button switches.
This type of installation would be best considered for new buildings or to be done during a remodel since it requires hardlines to be pulled through to every light and every wall plate that will be included in the system.
I did a sample layout of my house in Microsoft Paint. It doesn’t need to be too fancy.
I created a calculator to add up the cost of the inputs and outputs here Please don’t mess it up  It isn’t protected. Just fill out the four yellow cells and you can leave the rest as default. It will add up what you need to order.
Inputs side
How the switches work
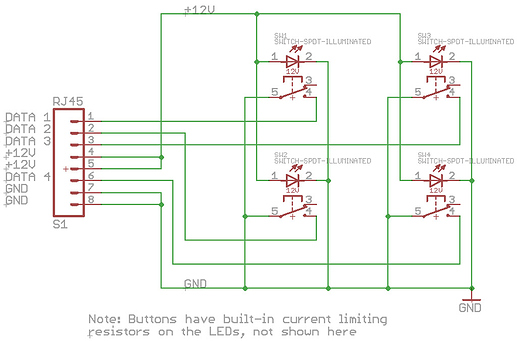
These are nothing more than a button at the end of a very long wire run. It goes directly into a digital input on a Arduino back in the control box/base station. The single, Dual, and Quad button modules can be switched out later without any additional wiring. This requires RJ45 / Cat5/6 cable to be run from each wall plate back to the base station located in a networking closet. There are a few components in that chain which we’ll talk about later, but electrically they are just momentary buttons at the end of long wires.
Image from Episode #25
You select how many buttons you need and pick up the PCBs and buttons from HERE
You’ll pick up some wall plate blanks at your hardware store and cut out the 16mm holes for the buttons. Mount the buttons to the wall plate and solder the other end into the PCB and that is done. Plug in the RJ45 and mount in the wall. That part is done.
Reading the buttons
On the other end of the RJ45 cable, we need to wire each signal into a microcontroller. There are a few ways to do this. Jon has made it simple using standard connectorized jacks and a variety of shields. His current iteration uses a RaspberryPi (I believe) as the microcontroller; but the website is currently offering the Arduino styles.
Simple version
The simple option is a basic Arduino Uno style shield HERE which works with up to two wall plates. Note that from here on, I will refer to the wall plate as a unit. It won’t matter if there is one button or four since they are using the standard connectors. So you would be able to write code on a single Uno for two wall plates (between 1 and 8 buttons).
Advanced version
The more advanced version uses a breakout block to split the Ethernet jacks into IDC headers which run over to an Arduino Mega shield. This has four components:
IO Breakout to RJ45
Takes the RJ45 from four wall plates and converts to 2x IDC (“Standard”) pin headers.
IDC cable
Sold in 3 lengths (or you could make your own). Connects the breakout above to the shield.
IO Breakout Shield for Arduino Mega
Fits on standard Mega, but consider the EtherMega since that has onboard Ethernet and supports PoE. Has enough inputs for 16 wall switches.
EtherMega
The EtherMega is not required; you could use a normal Arduino Mega, but this adds the functionality of onboard Ethernet with PoE
There is also THIS option for using an Uno with up to six wall plates. Again; consider the EtherTen with onboard ethernet.
So that gets the buttons back into a microcontroller. You would have to write code to poll the inputs of fire interrupts on each press, then most likely push that over to a rules engine like Node-Red, OpenHAB, HomeAssistant, etc.I would probably suggest using the EtherMega with the Ethernet library and MQTT library installed. Mqtt.Publish(“LightSwitches/plate4/button2/”, “ON”) or something like that.
There are a lot of different ways to plan this out and expand it over time, but this is a good base of where to start.
That is a summary of how the light switch (input) side works. I’ll do another write-up on the outputs side for mains switching.

